

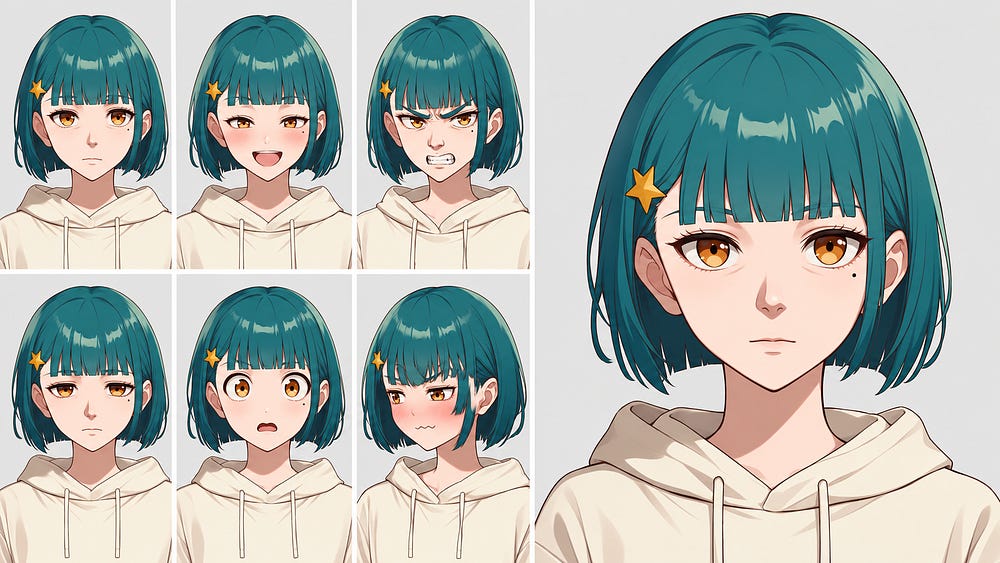
Generating an anime-style character is one thing. Getting their facial expressions right is another thing.
You see, AI image generators have become powerful enough to create whatever image we can think of with just a single prompt. But one thing many image models still struggle with is generating the correct facial expressions of a character.
Ask for “angry,” and you often get the same blank face with slightly lowered eyebrows. Ask for six emotions and two of them are likely to come out looking like twins.
That’s what a character expression sheet is for.
It’s a single reference that shows how one character looks across different emotions, and it’s something you’ll keep coming back to if you’re making a manga, a visual novel, or a storybook.
In this guide, I experimented with PixAI to create a facial expression sheet of a character.
There are two ways to do this.
You can generate all the expressions on one sheet in a single run
You can create them one expression at a time from the same reference image
I tried both with the same character and the same six emotions, and then I tested what happens when one of the faces needs fixing.
If you want to know where I landed before reading the details, the sheet gave me livelier, more expressive faces for a fraction of the credits. Separate images are the better pick when you need individual files you can fix one at a time, but you’ll have to push the prompts harder to get strong emotions out of them.
I ran these tests on November 12, using Tsubaki.3 at XL resolution with High Priority mode on. At those settings, every generation cost 5,300 credits, whether it was a full sheet or a single face.
Let me share the results.
Start by generating a character in PixAI
Both methods depend on one thing, which is a clear reference image of your character. If the reference is messy, every expression you make from it will be messy too.
So before thinking about emotions, I made a neutral portrait. Head over to PixAI, open the Generate page, and pick Tsubaki.3 from Quick Select. It’s their current flagship model, and it’s the one that can take a reference image and follow editing instructions written in plain English.
Here’s the prompt I used for my character:
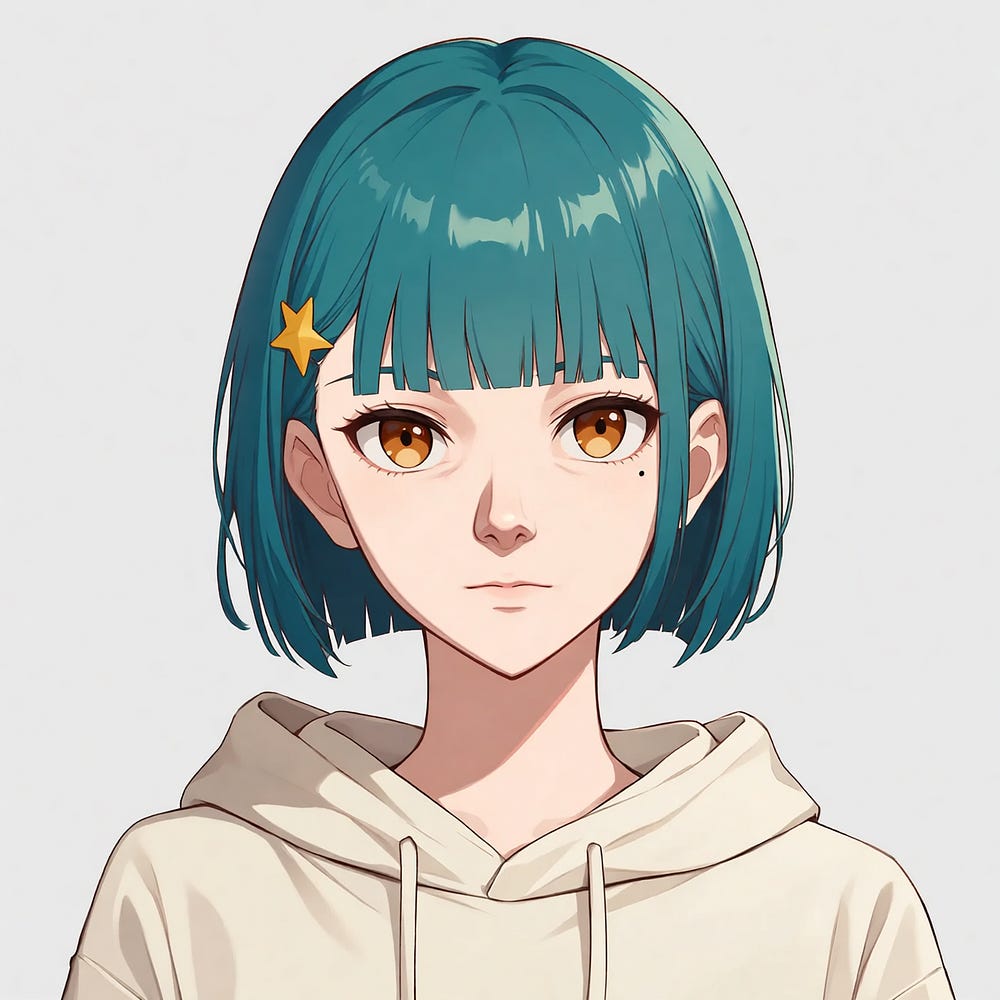
Anime-style portrait of a girl, a 20-year-old woman with a short teal bob cut, straight bangs, large amber eyes, and a small mole under her left eye. She wears a yellow star-shaped hair clip on the right side of her hair and a plain cream hoodie. Front-facing view from the chest up, neutral expression with a relaxed, closed mouth, eyebrows fully visible under the bangs. Plain light gray background. Clear facial features
A few things in that prompt are there on purpose.
The face is front-facing, and the eyes, eyebrows, and mouth are all fully visible. Those three are the parts that move when an emotion changes, so the model needs to see them clearly in the reference.
The character has two details that are easy to check at a glance: the star hair clip and the mole under her left eye. I call these anchor details. If the clip changes shape or the mole disappears in one of the expressions, I know right away that the character drifted.
Before moving on, write down what should never change. For this example, that’s the teal bob, amber eyes, the mole, the star clip, and the cream hoodie. Everything else on her face is allowed to move.
If you already have a character you like, you can skip the generation and upload your own image as the reference instead.
Make your first expression in PixAI
Before going for all six faces, I’d recommend trying just one. It’s the quickest way to see how Tsubaki.3 handles your character, and it only costs a single generation.
I started with happy because it’s the easiest emotion to judge at a glance.
Open the Generate page and pick Tsubaki.3 from Quick Select.
Attach your neutral portrait as the reference image. Once it’s attached, you can call it
@image1in the prompt.Turn off Prompt Helper so the model follows your wording exactly.
Set the resolution to XL. I left High Priority on, which gets your image back faster but costs more credits. You can turn it off if you don’t mind waiting in the standard queue.
Paste the prompt below and hit Generate.
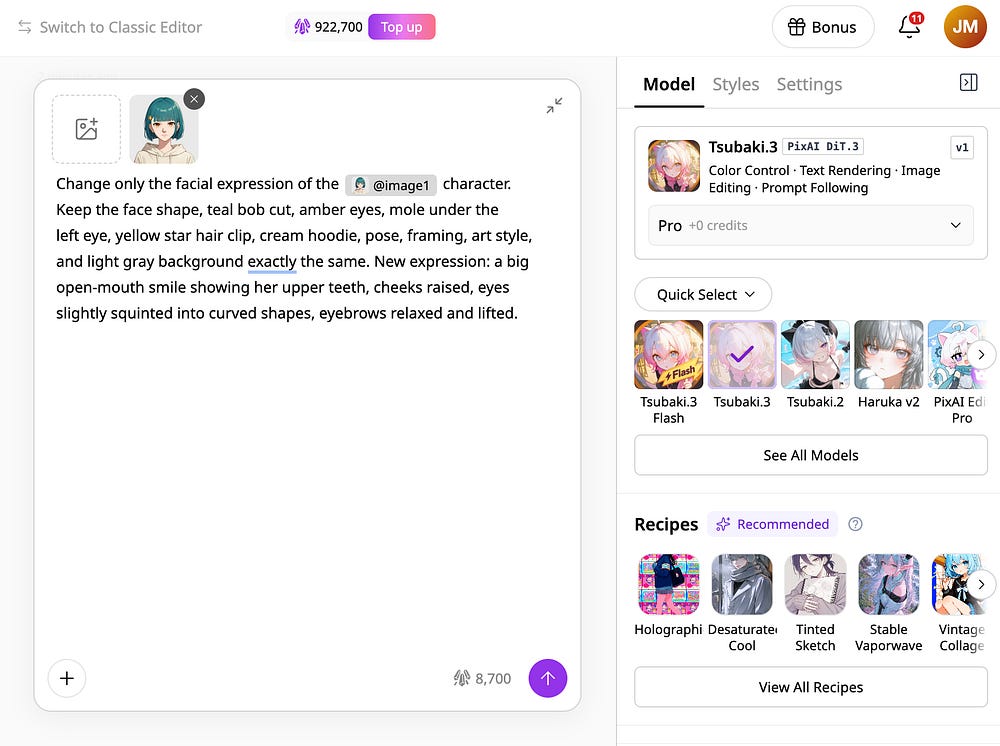
Prompt: Change only the facial expression of the @image1 character. Keep the face shape, teal bob cut, amber eyes, mole under the left eye, yellow star hair clip, cream hoodie, pose, framing, art style, and light gray background exactly the same. New expression: a big open-mouth smile showing her upper teeth, cheeks raised, eyes slightly squinted into curved shapes, eyebrows relaxed and lifted.
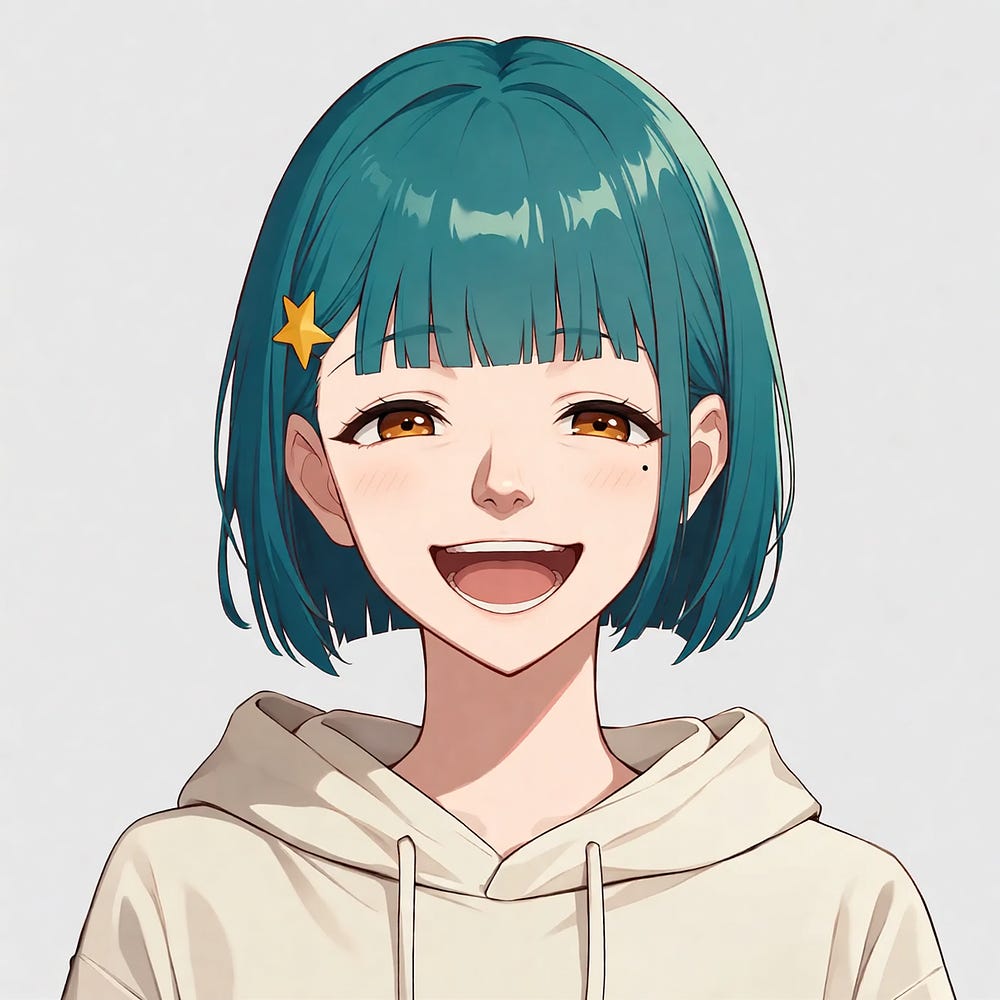
I got the result on the first attempt, and it cost 5,300 credits. The hair clip, the mole, and the hoodie all stayed the same, and only her face changed. The smile is on the gentle side, which I’ll talk more about in Method 2.
To try this with your own character, swap two things in the prompt. Replace the features in the keep list with your character’s details, and replace the last sentence with the emotion you want, written as what the eyebrows, eyes, and mouth are doing.
If you have an OC of your own, upload them to PixAI and try one new expression before reading further. A new account comes with enough starter credits to cover this first test.
Method 1: Generate all six expressions on one sheet
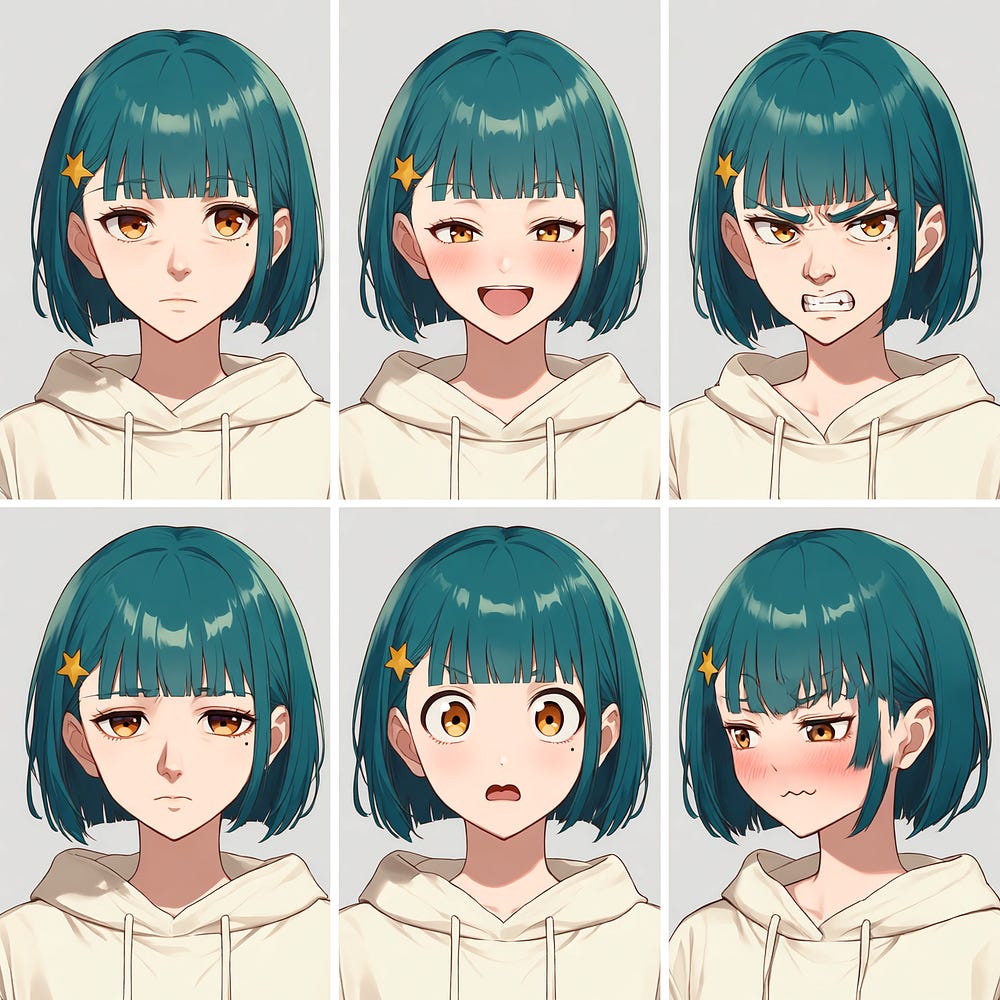
The first method is the fast one. You attach the reference image, describe the whole sheet in one prompt, and get all six faces back in a single image.
Attach the character’s portrait as a reference image so you can call it @image1 in the prompt. I also turned off Prompt Helper for this, because I wanted the model to follow my wording exactly instead of a rewritten version of it.
This is what your PixAI image generation dashboard is going to look like:
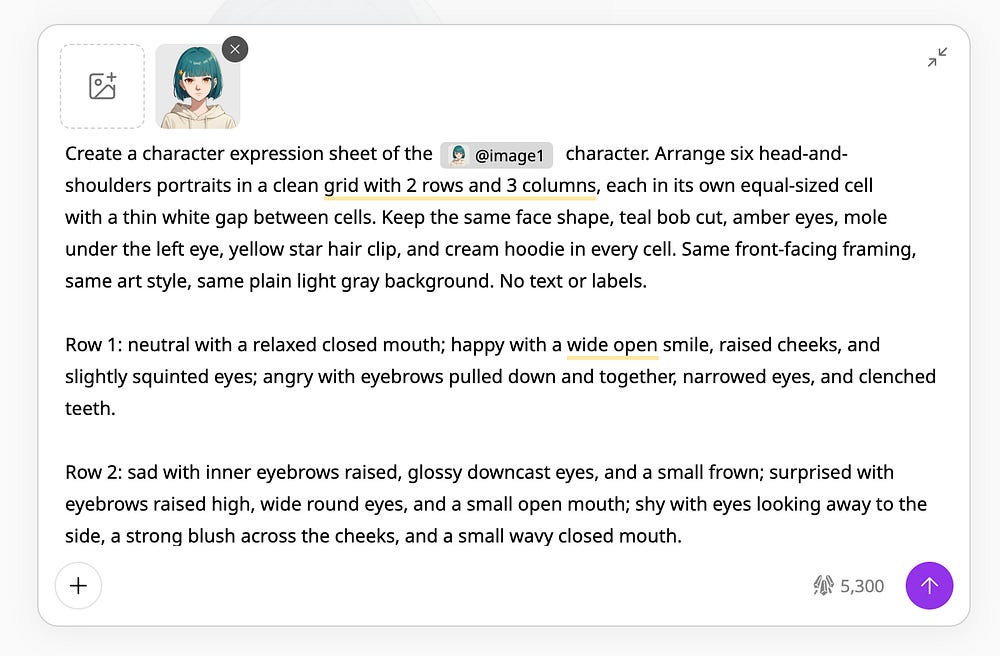
Here’s the prompt:
Create a character expression sheet of the @image1 character. Arrange six head-and-shoulders portraits in a clean grid with 2 rows and 3 columns, each in its own equal-sized cell with a thin white gap between cells. Keep the same face shape, teal bob cut, amber eyes, mole under the left eye, yellow star hair clip, and cream hoodie in every cell. Same front-facing framing, same art style, same plain light gray background. No text or labels.
Row 1: neutral with a relaxed closed mouth; happy with a wide open smile, raised cheeks, and slightly squinted eyes; angry with eyebrows pulled down and together, narrowed eyes, and clenched teeth.
Row 2: sad with inner eyebrows raised, glossy downcast eyes, and a small frown; surprised with eyebrows raised high, wide round eyes, and a small open mouth; shy with eyes looking away to the side, a strong blush across the cheeks, and a small wavy closed mouth.
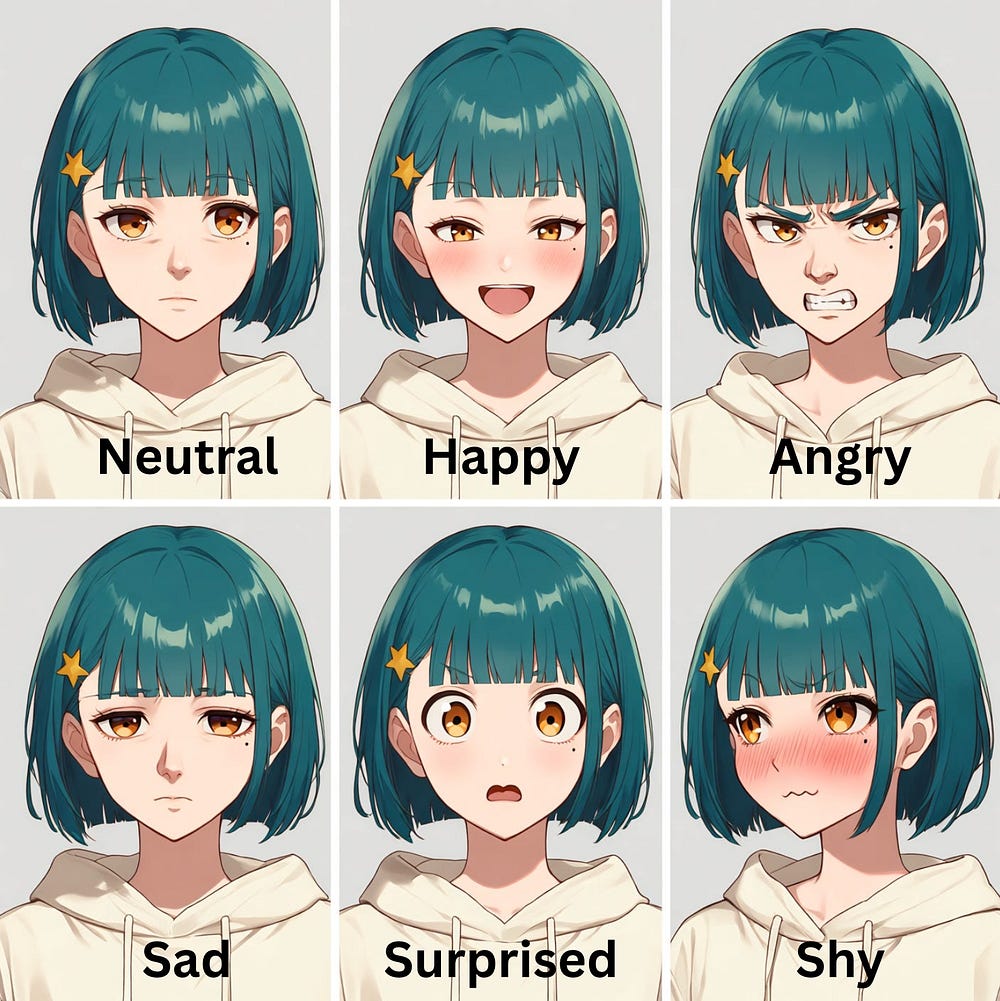
Looking at the final output, I have to say, the results are awesome. I love how animated the expressions turned out. They still resemble the original character, yet each varied face successfully captures the exact emotion I was aiming for.
It also came out right on the first attempt, so the whole sheet cost me 5,300 credits. That’s six faces for the price of one image.
The prompt has four parts, and you can reuse the same order for your own character.
It starts with what to make and how the grid is laid out.
Then it lists the features that must stay the same.
Then the framing and background.
The emotions come last, grouped by row.
Notice that I didn’t just write “happy, angry, sad.”
Each emotion comes with what the eyebrows, eyes, and mouth are doing. This matters more than anything else in the prompt. A single emotion word leaves the model to guess, and its guess is usually a small change to the mouth while the rest of the face stays frozen.
I also asked for no text. Generated labels can come out misspelled or land on the wrong cell, so it’s easier to add them yourself afterward in any image editor. That’s how I added the labels on the sheet above.
What to check on the sheet
Once the sheet is done, go through it cell by cell.
Count the emotions first. All six should be there, and each one should appear only once.
Look for twins. Happy and shy are the pair most likely to end up looking alike, because both involve a smile and a blush. Sad and neutral are the other pair to watch.
Check the anchor details in every cell. For my example, that means the mole is still under the left eye and the star clip is still on the same side.
Check the framing. Every head should be about the same size and none of them should be cut off at the edge of a cell.
What I like about this method is that you see the character’s whole emotional range in one image. It’s the quickest way to find out if a design can carry different moods before you commit to it.
And if you want to go beyond expressions and build a full reference package with a turnaround, outfit details, and a color palette, PixAI has a guide to OC and VTuber character sheets that takes the same idea further.
Method 2: Edit one expression at a time
The second method takes a bit longer, but you get more control over each face.
Instead of asking for a grid, you go back to the original neutral portrait and ask Tsubaki.3 to change only the expression. You do this once per emotion, and each result is its own full-size image. If you followed the walkthrough above, you’ve already done the first one.
The important rule is to always start from the original reference. Don’t edit the happy image to make the angry one. Every edit moves the character a tiny bit away from the original, and if you chain edits together, those small changes pile up.
The neutral portrait already counts as your neutral expression, so you only need five edits.
I used one shared instruction for all of them and only swapped the last sentence:
Prompt: Change only the facial expression of the @image1 character. Keep the face shape, teal bob cut, amber eyes, mole under the left eye, yellow star hair clip, cream hoodie, pose, framing, art style, and light gray background exactly the same. New expression: [EXPRESSION]
And here’s what I put in place of [EXPRESSION] for each one:
Happy: a big open-mouth smile showing her upper teeth, cheeks raised, eyes slightly squinted into curved shapes, eyebrows relaxed and lifted.
Angry: eyebrows pulled down and together, narrowed eyes glaring straight at the viewer, clenched teeth, a tense jaw.
Sad: inner ends of the eyebrows raised, glossy eyes looking down with tears starting to form, lips pressed into a small trembling frown.
Surprised: eyebrows raised high above the bangs line, eyes wide open and round with small pupils, mouth open in a small “o” shape.
Shy: head tilted slightly down, eyes looking away to the lower right, a heavy pink blush across both cheeks and the nose, a small wavy closed mouth.
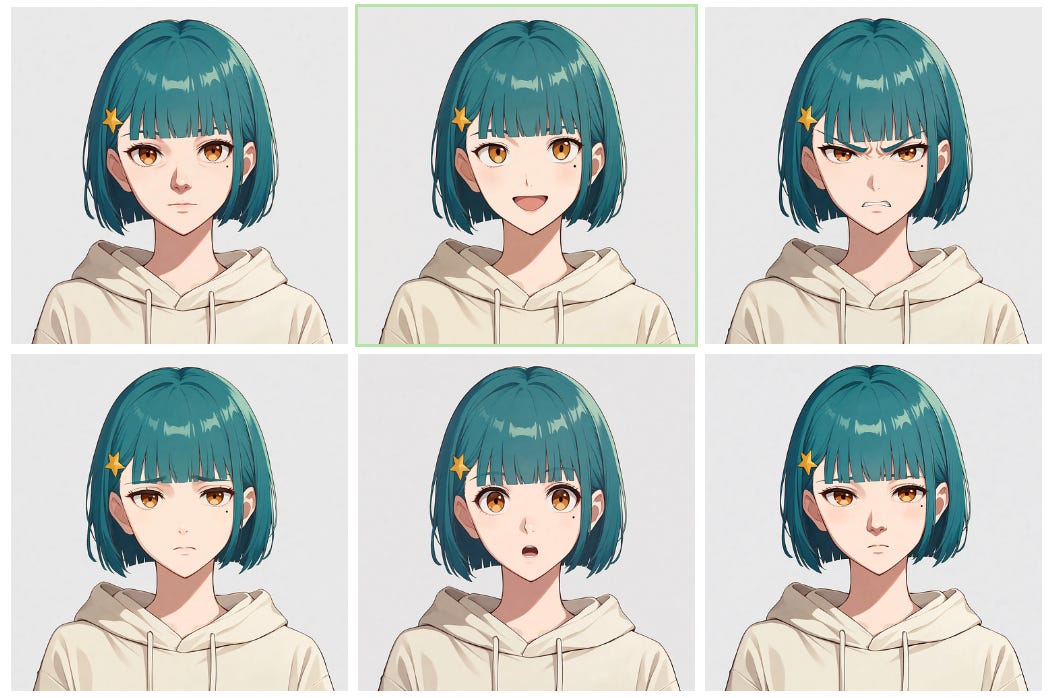
Each edit worked on the first attempt at 5,300 credits, so the five edits came to 26,500 credits.
To use this for your own character, replace the character’s features in the keep list with your own, and leave the rest as it is.
The fun part about this method is that you can control how strong an emotion is. “Angry” could mean mildly annoyed or completely furious, and on a sheet you mostly get whatever the model decides.
Here, you can write “slightly annoyed, one eyebrow lowered, mouth pulled to one side” and get that specific version.
You also end up with six separate files at the same size and the same framing. If you plan to use the faces in a visual novel or as reaction images, that’s the format you need anyway.
However, looking at the individual results and comparing them back to the single expression sheet above, I found the level of expression here to be way lower. There’s barely any noticeable change on her face.
Yes, you can technically detect the intended emotion, but the variation is minimal. I really wish there had been more dramatic head tilting, skin color changes, eyebrow movement, and overall facial dynamism to give each portrait more life.
What happens when one expression needs fixing?
No matter which method you use, one face will probably come out wrong. The shy one could look too much like the happy one, or the angry one could look more bored than angry. How easy it is to fix that one face is the biggest difference between the two methods.
On a sheet, all six faces are part of the same image. You can’t just regenerate one of them.
You have two options.
The first is to run the whole sheet again with a better description for the weak emotion. That works, but you’re also rolling the dice on the five faces that were already fine.
The second option is to edit only the bad cell. The model only repaints what’s inside a mask and leaves everything else alone.
I went with the second option and used it on the shy face in the bottom-right cell. Here’s how:
Upload the finished sheet to PixAI’s image editor. Uploading an image puts you straight into edit mode.
Switch to mask mode and paint over the shy face. Paint the mask a little larger than the face and turn on feathering so the new face blends into the cell.
Type a prompt that describes only the new expression, then click Generate.
This is the prompt I used:
Eyes looking away to the lower right
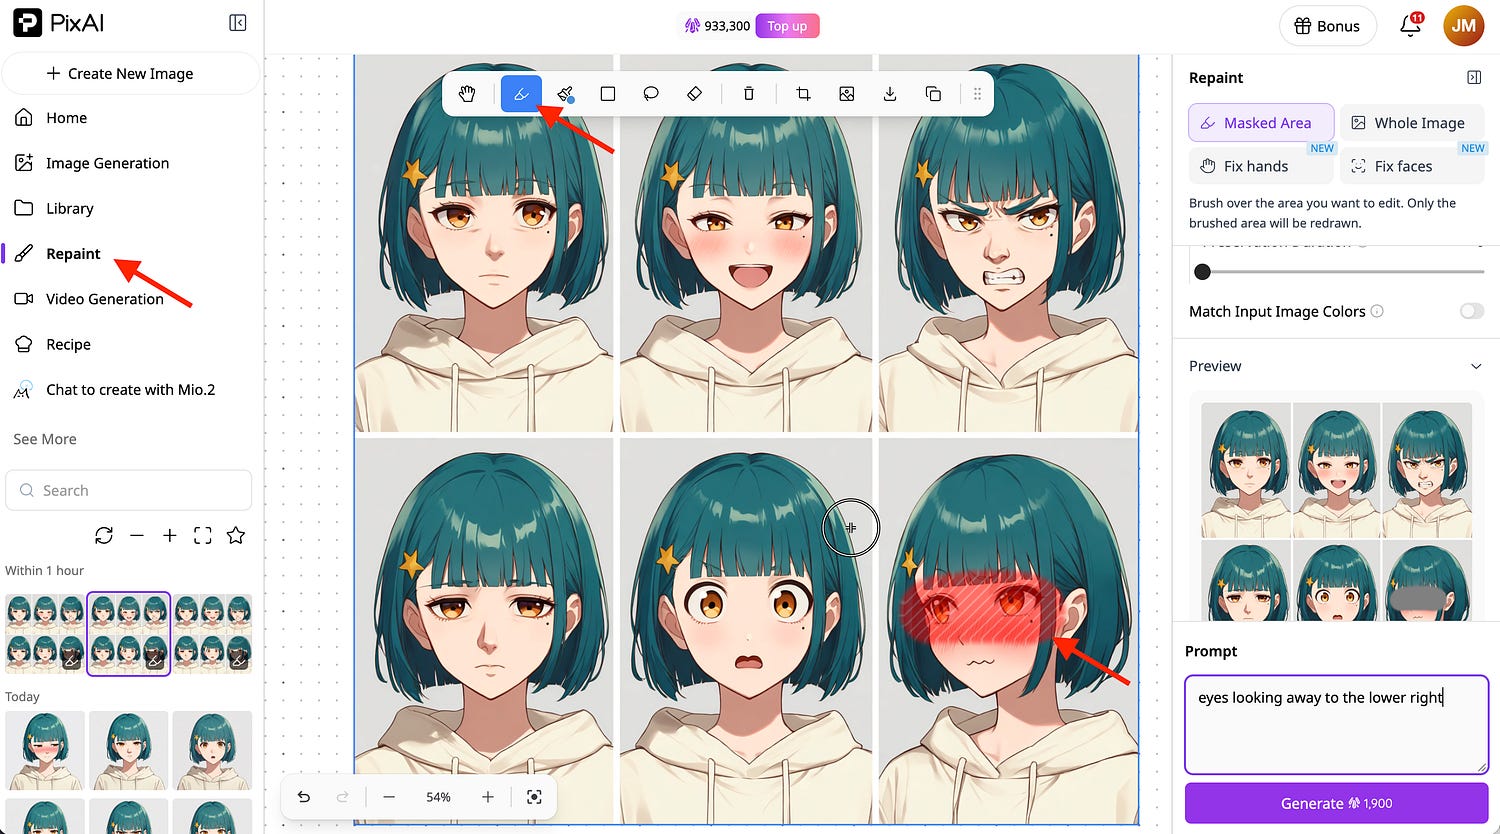
After the fix, check the cells next to it and make sure the mole and the star clip are still in the right place on the repainted face.
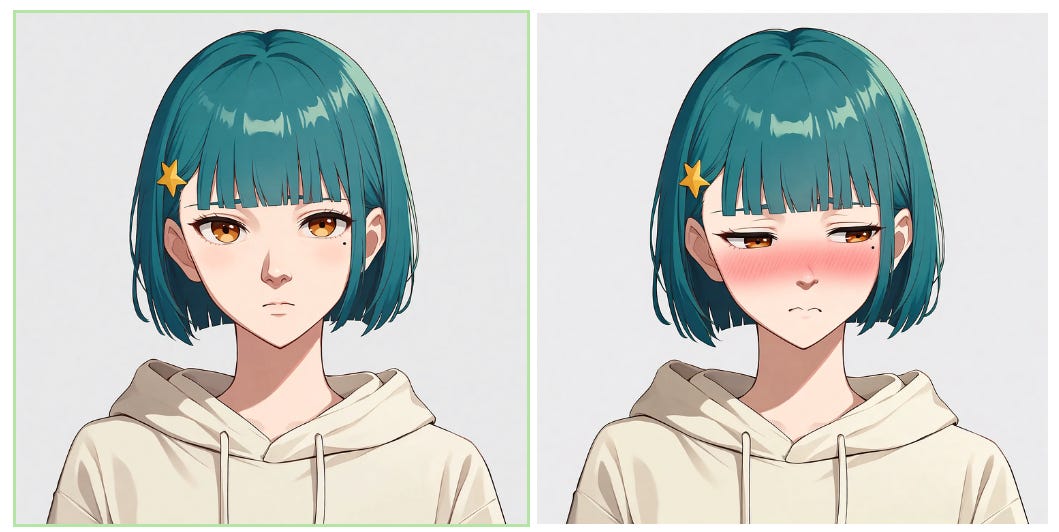
With separate images, the fix is simpler. You go back to the original reference, rewrite the expression, and generate that one image again. The other five files aren’t touched at all.
Since the shy face from Method 2 was one of the flattest results, I regenerated it using the same shy description from the sheet fix above.
Here’s the before-and-after edit of the shy expression:
One more thing about cropping
You might be tempted to generate the sheet and then crop the six faces into separate files. You can do that for quick previews, but keep your expectations low.
Each cropped face is only a fraction of the sheet’s resolution. The crops won’t line up perfectly with each other, and you won’t get transparent backgrounds.
If you need separate images that are ready to use, make them separately.
Which workflow should you choose?
Here’s how the two methods compare in my test. Both used the same neutral reference, which cost one 5,300-credit generation and isn’t counted in the totals below.
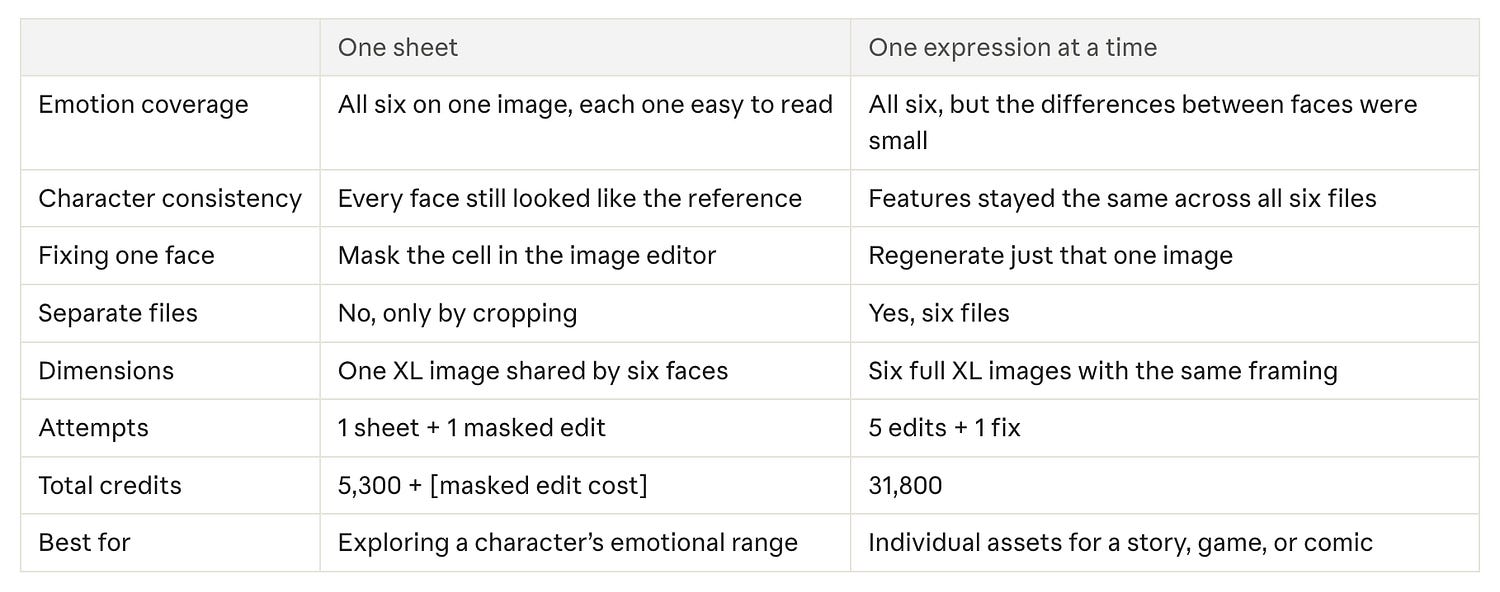
The sheet wins on cost and, in my test, on how expressive the faces looked. The individual images cost about six times more, but you get files you can fix and use one by one.
Keep in mind that neither method gives you transparent backgrounds or sprites that a visual novel engine can use right away. You’ll still need to remove the background and line the images up yourself.
If you’re new to PixAI, you can sign up through this link to get 50,000 extra credits. You don’t need the bonus to get started, though. Your first expression costs 5,300 credits at the settings I used, and the starter credits on a new account already cover that.
Frequently asked questions
How do I make an expression sheet from an existing character?
Attach a clear, front-facing image of your character as a reference in Tsubaki.3, then describe the grid and each emotion in one prompt. List the features that must stay the same, like hair, eye color, and accessories, so the model keeps them in every cell.
Why do several expressions look almost identical?
Usually because the prompt only names the emotions. Words like “happy” and “shy” leave the model to guess, and it often changes just the mouth. Describe what the eyebrows, eyes, and mouth are doing for each emotion, and the faces will be much easier to tell apart.
How do I fix only one expression?
On a sheet, open it in PixAI’s image editor, mask the face you want to redo, and describe the new expression. For separate images, go back to the original reference and generate that one expression again with a more specific description.
Final Thoughts
If you’re making a character for a storybook, a manga, an anime series, or anything else where the same face shows up again and again, an expression sheet is one of the most useful things you can prepare.
It’s your proof that the character still looks like themselves when they’re laughing, crying, or furious, and it saves you from finding out halfway through a project that your hero has no convincing sad face.
Personally, I’d make the full sheet first to see what the character can do, and then switch to one expression at a time for anything I actually plan to use.
Both methods have their own place. A full expression sheet is great for exploring your character’s wide range of emotions, while separate images give you more control and suit individual assets better.
Whichever you choose, start with a clear and accurate reference and describe each expression in detail. Tell the model what the eyebrows, eyes, and mouth are doing instead of just naming the emotion.
If you want to take your character further, I also wrote a guide on how to make manga pages with Tsubaki.3, and an expression sheet like this one is a good thing to have ready before you start on panels.
Let me know your thoughts in the comments!
Hi there! Thanks for making it to the end of this post! If you enjoyed this content and would like to support my work, consider becoming a paid subscriber. Your support means a lot!