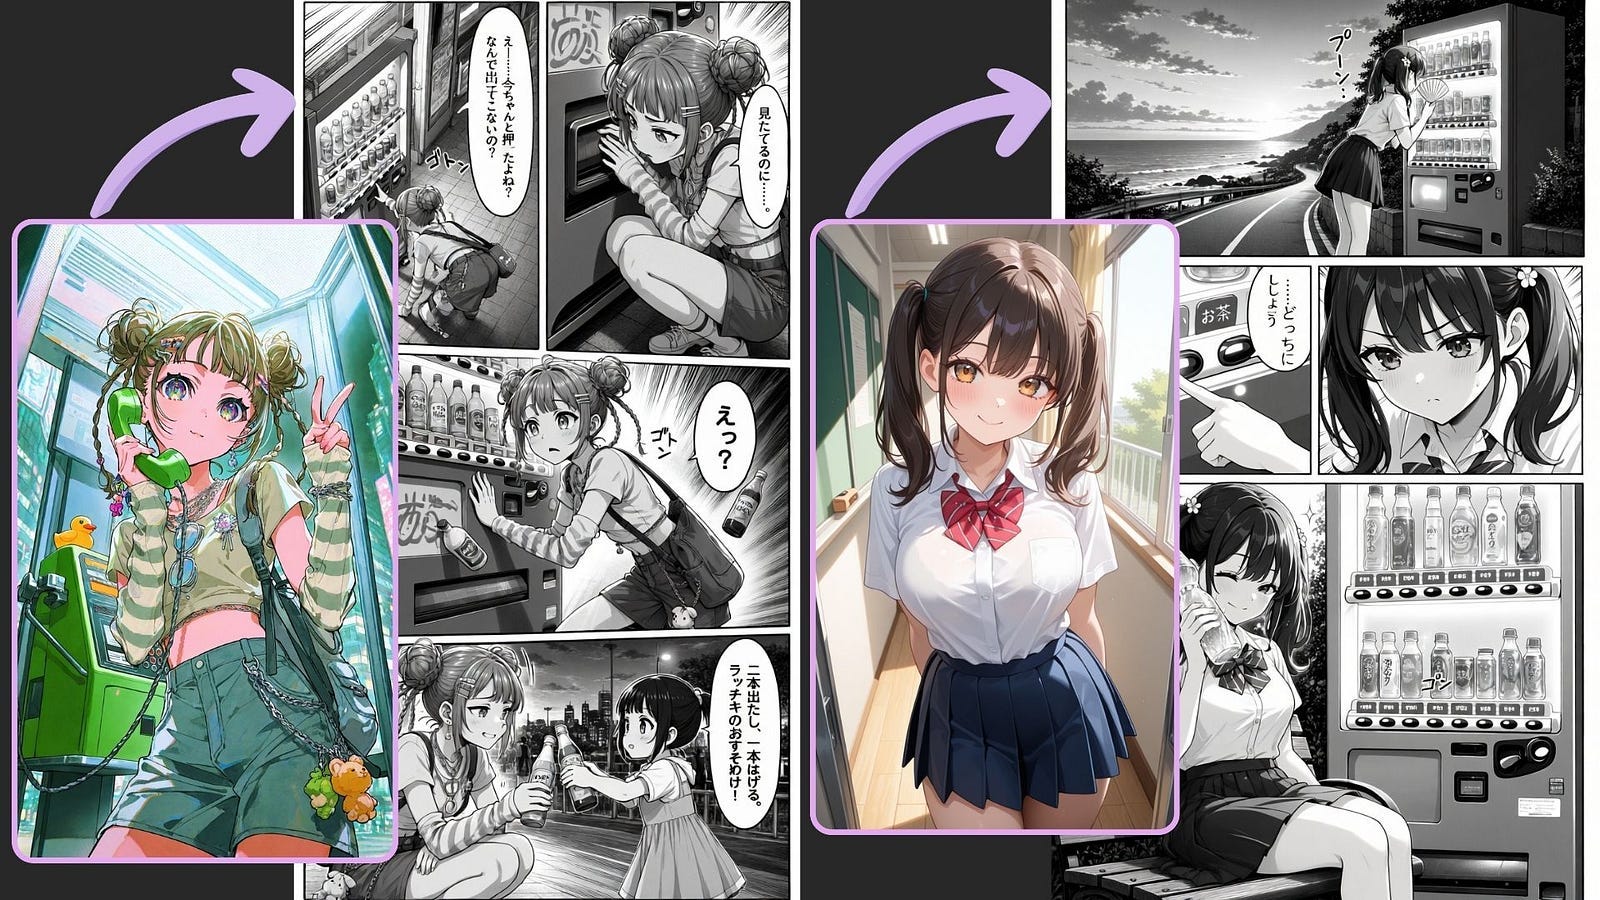
One of the coolest use cases I’ve seen for image models is generating manga pages. A single prompt can now produce the characters, setting, camera angles, speech bubbles, and even the dialogue inside them.
Sure, general-purpose AI apps such as ChatGPT and Gemini can create this type of content. However, I often notice the same strange anime aesthetic, inconsistent characters, and limited control over how each manga panel is composed.
Text rendering is another problem. Dialogue is sometimes misspelled, placed inside the wrong bubble, or has inconsistent font size/style.
A dedicated AI manga generator gives creators much more control.
PixAI’s Tsubaki.3 model supports manga panelling, in-image typography, character references, and complex scenes involving multiple characters. It can also use an existing page as a structural reference instead of inventing a new layout for every generation.
So, if you are interested in creating your own manga pages or even turning them into full storybooks, I’ve got you.
In this guide, I will show you how to create manga pages using only text prompts, character images, and panel templates.
Let’s get started.
Here’s How It Works
Head over to PixAI and create an account. Open the image generator, upload a sample character image, and write a prompt describing the page you want to produce.
This is the prompt I used for my first test:
Prompt: Japanese black-and-white manga style, single-page four-panel layout with irregular panels, ink lines, halftone shading, solid black areas, speed lines, and sound effects. Preserve the reference character’s exact appearance, including her double buns, thin braids, colorful hair clips, large eyes, cropped top, striped arm warmers, loose shorts, glasses, shoulder bag, chains, and plush charm. Near a city station at dusk, Panel 1 is a vertical upper-left panel showing her bending toward a vending machine after her drink gets stuck, pointing at it with a confused expression and saying, “Wait… I pressed it properly. Why isn’t it coming out?” Panel 2 is a small upper-right close-up showing her crouching and peering into the dispensing slot, her face nearly touching the machine, saying, “I can see it in there…”

I also adjusted a few generation parameters. I selected Tsubaki.3 as the image model, set the aspect ratio to 3:4, chose high image quality, and generated one image.
A portrait ratio works well for manga pages because it gives the model enough vertical space to separate the panels without making every scene feel cramped.

I intentionally used a reference image that did not completely match the character description in the prompt. I wanted to see whether the model could combine the person in the reference with the clothing and hairstyle requested through text.
The output followed both sources surprisingly well. The subject still looked like the character in the uploaded image, but the model changed her hair, outfit, and accessories according to the prompt.
Tsubaki.3 can use up to three character references, and those references may come from previous PixAI generations or uploaded images. The model also supports instruction-based editing, so an incorrect outfit, expression, or text element can be changed without rebuilding the entire image from the beginning.
Let’s do another one without an input image.
Prompt: Black-and-white four-panel manga featuring the girl from image 1 after a long summer walk, preserving her twin braids, flower accessories, soft eyes, and summer outfit. Use a wide top panel, two smaller middle panels, and a wide bottom panel with white margins and narrow gutters. The top shows her beside a glowing vending machine on a quiet coastal road, studying the drinks while fanning herself. The middle-left shows her finger hesitating between 「ラムネ」 and 「冷たいお茶」, while the middle-right shows her making an overly serious face and saying 「……どっちにしよう。」 The final panel shows her smiling on a roadside bench with a cold, sparkling ramune bottle against her cheek. Add 「ブーン…」 for the machine hum, 「ピッ」 for the button press, and 「ゴトン」 for the falling bottle.

I love how consistent the character looks across the page. Her hairstyle, facial features, and outfit remain recognizable, while her expression changes naturally as the small story develops.
The changes in framing also help. The wide establishing shot introduces the location, the close-up shows her choice, and the final panel resolves the scene. These camera changes make the page feel illustrated by someone who understands manga composition rather than an image model repeating the same portrait four times.
The Japanese characters are clear and readable too. Aside from the speech bubble, the added sound effects give the panels more energy. 「ピッ」 and 「ゴトン」 describe actions that would otherwise need another sentence of narration, which is exactly how good manga lettering should work.
Manga, Webtoon, and Anime Screenshot Styles
The same workflow is not limited to traditional black-and-white pages. Changing a few visual instructions can turn the generation into a colored Webtoon episode or an anime screenshot.
Manga: Ask for monochrome ink, screentone shading, white gutters, speed lines, high-contrast shadows, and Japanese sound effects.
Webtoon: Use full color, clean digital line art, soft shading, vertical storytelling, wider spacing between scenes, and dialogue bubbles designed for mobile reading.
Anime screenshot: Choose a 16:9 ratio and request cel shading, cinematic framing, background lighting, and subtitle-style text along the bottom instead of manga speech bubbles.
I would avoid combining all three styles in one prompt. A clear visual direction gives the model fewer conflicting decisions to make and usually produces a more coherent image.
Pages Matching a Reference Panel Layout
PixAI can also follow a reference panel layout. This is useful when I already have a page template or rough storyboard and want the AI to fill its empty spaces with finished scenes.
Instead of describing every panel’s dimensions, I can upload the template as the first reference. Additional images can then define the characters appearing on the page. PixAI’s own Tsubaki.3 showcase demonstrates this workflow using one layout reference and separate character images.
Here is what the image generator dashboard should look like:

These are the three input images. The first controls the page structure, while the other two introduce the characters:

Prompt: Japanese black-and-white manga style, single-page four-panel comic using the exact panel layout from reference image 1. Use the two characters from reference images 2 and 3 without changing their appearance or clothing. The black-haired character is casual, quick-moving, and slightly careless, while the blond character is calm, gentle, and mildly exasperated. Set the light, humorous scene along an outdoor walkway near a university building. In the large top establishing panel, show them walking side by side in a medium full-body shot. The black-haired character looks at his phone while carrying coffee and speaking casually, while the blond character holds several books and quietly looks toward him. Include simplified campus buildings in the background. Black-haired character’s dialogue: 「このあと時間ある? 駅前に新しいカフェできたらしいし、ちょっと寄ってみない?」

The resulting page stayed close to the reference structure, and the scenes inside the frames followed the prompt. More importantly, the model understood that the references had different jobs. One supplied the composition, while the other two supplied character identities.
I also like how the speech bubbles float over the frames rather than being squeezed inside them. The AI manga panel generator had limited room for two characters, books, coffee, a phone, background architecture, and a fairly long line of Japanese dialogue, yet the page still remained easy to follow.
I can prepare layouts in advance, reuse the same character references, and change only the scene instructions and dialogue. That creates a repeatable workflow for producing a short chapter instead of treating every page as an unrelated image.
Who Can Benefit from this Tool?
An AI comic generator will not replace every part of drawing and editing a manga, but it can shorten several early stages of production.
It is especially useful when the goal is to explore an idea, test a sequence, or create a readable draft without illustrating every frame manually.
Manga artists and writers can turn scripts and rough layouts into visual storyboards. This makes it easier to test pacing, camera angles, dialogue length, and panel order before producing final artwork.
Original character and VTuber creators can place an existing character in short stories, reaction comics, promotional scenes, and alternate settings while preserving recognizable features across the page.
Webtoon creators, video teams, and social media publishers can develop vertical comics, anime-style storyboards, short episodic posts, and visual scenes that may later be animated or edited into videos.
The reference workflow also helps people who are stronger at writing than drawing. A creator can begin with dialogue and a rough page template, then let Tsubaki.3 handle the first visual version.
I would still recommend using original or properly licensed character references, especially when the finished images will be published or used commercially.
Final Thoughts
Alright, I just showed you that the process of creating a manga page with AI involves more than asking for a black-and-white anime image. In these tests, I used character references, structured panel descriptions, direct dialogue, Japanese sound effects, and a reference layout to control how the story appeared on the page.
As you’ve seen, the model could manage both individual illustrations and multi-character sequences.
My favorite use case is reference-based page generation. It gives writers and artists a practical way to turn rough storyboards into complete scenes while keeping the characters and panel hierarchy consistent. Tsubaki.3 handled this particularly well, especially when moving between close-ups, full-body shots, expressions, and longer dialogue.
I also want to thank PixAI for releasing a refreshed image generator alongside Tsubaki.3. PixAI rebuilt its generation panel for the new model, while its larger model library gives creators plenty of room to experiment with different manga, Webtoon, and anime styles.
What do you think about using AI to create manga panels? Would you use it for finished pages, early storyboards, or simply bringing an original character into a short story? Let me know in the comments.
Hi there! Thanks for making it to the end of this post! If you enjoyed this content and would like to support my work, consider becoming a paid subscriber. Your support means a lot!


