

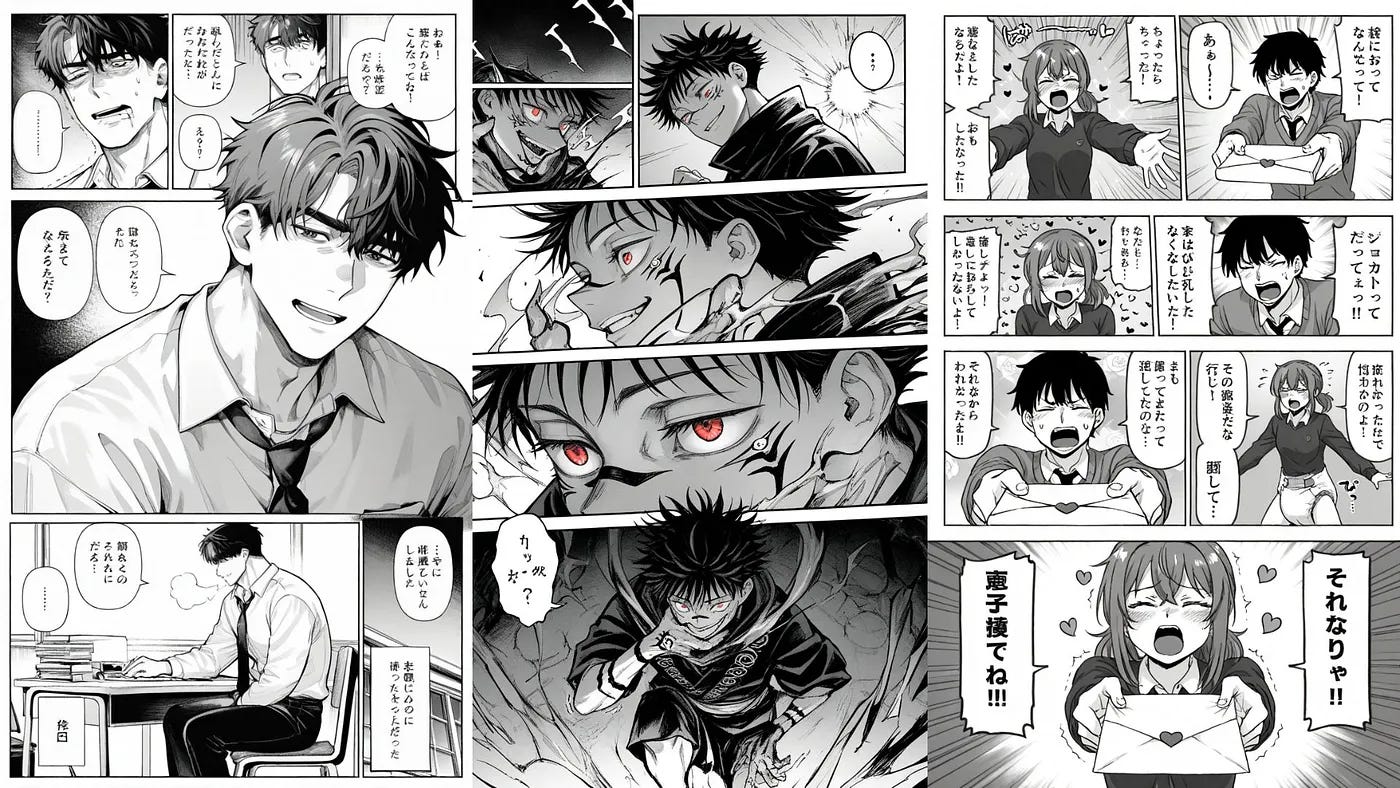
I've tried many image models, both open source and closed source, over the past five years. One fun use case for them is making manga panels for short anime stories in a printed comic format.
One of the biggest pains when using AI for manga art is consistency.
Image quality has improved a lot in the past couple of years, but making sure the characters look the same in every panel is still the hardest thing to get right. Another problem is misspelled text in speech bubbles.
These mistakes are expensive, because I often end up regenerating the entire page when the AI messes up just one part of it.
In this tutorial, I’ll show you how I used Tsubaki.3 on PixAI as an AI manga generator to make a four-panel page about an office worker who gets caught in the rain.
I’ll go through how I planned the story, wrote the prompt, checked the first result, and fixed the mistakes one panel at a time.
Plan a Short Manga Scene Before You Generate
Before I wrote any prompt, I planned the story panel by panel. I think this is the most important step. If I don’t know what each panel should show, the AI won’t know either.
A good short scene needs a beginning, a twist, and an ending. I also make sure every panel shows something different. It could be a new action, a new facial expression, or a different camera distance. If two panels show the same pose with only a slightly different face, one of them is basically wasted space.
Here’s the plan I used:
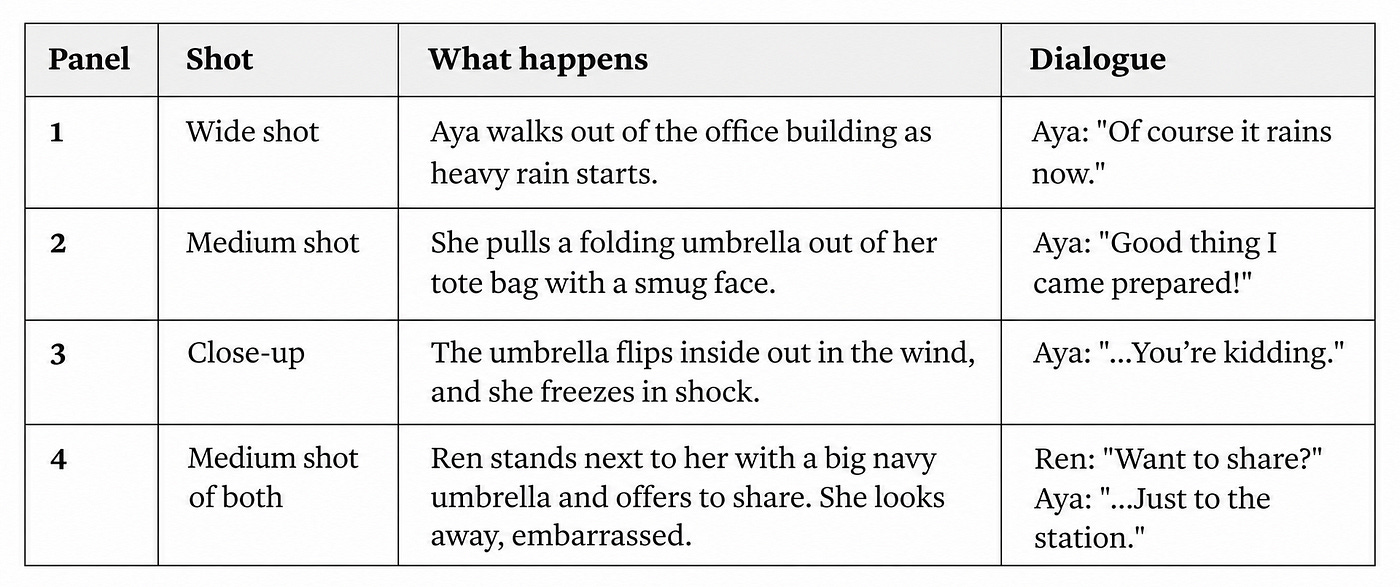
I kept the dialogue short on purpose. Short lines fit better inside speech bubbles, and the AI is less likely to misspell them.
Creating the Character Reference
Next, I created a reference image of both characters using Tsubaki.3. This gives the model something to copy when it draws the full page.
Prompt: Character reference sheet, black-and-white manga style, two characters standing side by side on a plain white background, full body. Left: Aya, a young woman office worker with a short dark bob, a yellow hair clip on the left side of her hair, round glasses, a beige trench coat over a white blouse, a red scarf, and a tote bag with a small cat keychain. Right: Ren, a tall young man with messy light brown hair, a gray suit with a loosened tie, holding a closed navy umbrella. Clean ink lines, simple shading.
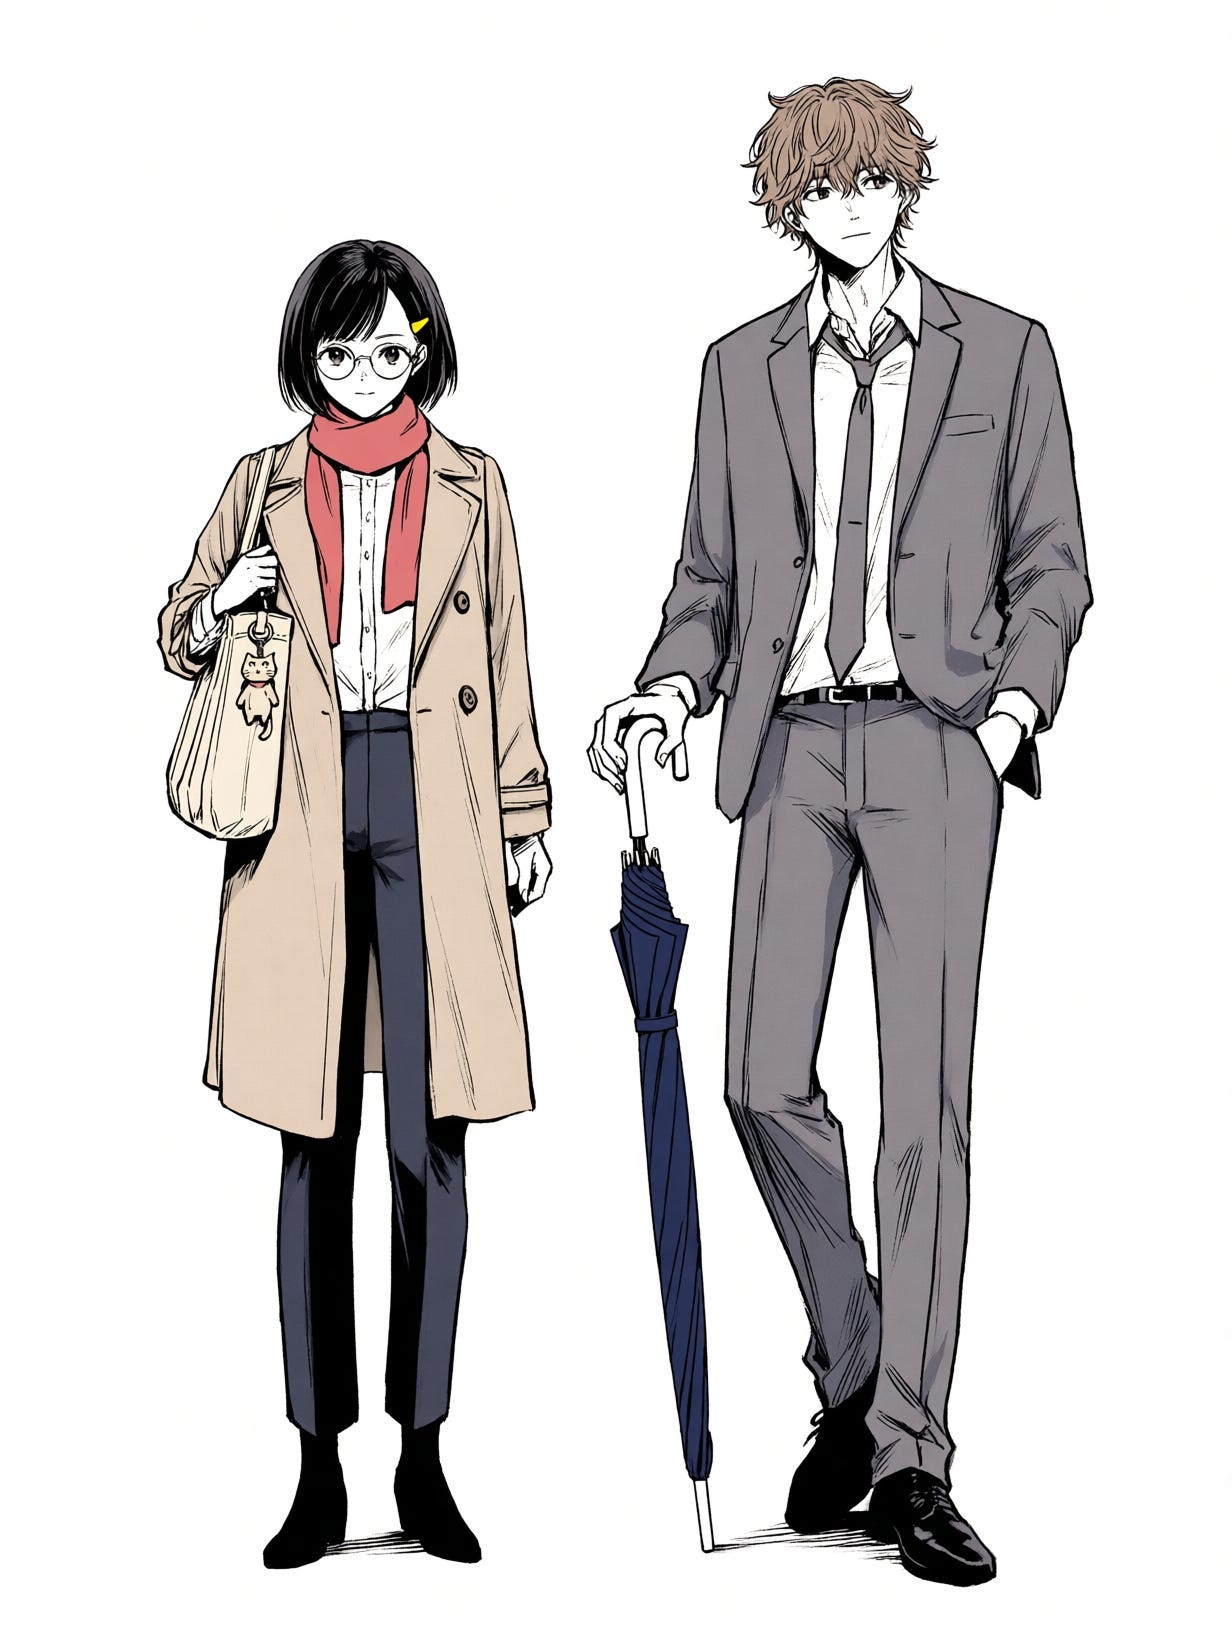
I gave Aya a few small details on purpose: a yellow hair clip on one side, glasses, a red scarf, and a cat keychain. Small details like these are usually the first things the AI forgets or changes between panels, so they make it easy to check if the character stays consistent.
If you plan to reuse the same characters across many pages, PixAI’s character consistency guide covers a few other methods. For this page, I only used a reference image.
Write a Manga Page Prompt for Tsubaki.3
I split my prompt into three parts. The first part describes the whole page, like the art style, the layout, and the reading direction. The second part describes the characters. The third part describes each panel in order, including the camera shot, the action, the facial expression, and the dialogue.
I do this so the AI doesn’t get confused about which details apply to the whole page and which ones belong to just one panel.
Here’s the full prompt I used:
Prompt: Japanese black-and-white manga page, ink lines, screentone shading, rain effects. Single page, four panels in two rows, read left to right, top to bottom, with white gutters between panels. Use the two characters from @image1 and keep their appearance the same in every panel. Aya: short dark bob, yellow hair clip on the left side, round glasses, beige trench coat, red scarf, tote bag with a cat keychain. Ren: tall, messy light brown hair, gray suit, loosened tie, navy umbrella.
Panel 1 (top left, wide shot): Aya steps out of a glass office building entrance at dusk as heavy rain starts falling. She looks up at the sky, annoyed. Speech bubble from Aya: “Of course it rains now.”
Panel 2 (top right, medium shot): Aya pulls a small folding umbrella out of her tote bag with a confident, smug smile. Speech bubble from Aya: “Good thing I came prepared!”
Panel 3 (bottom left, close-up): The umbrella has flipped inside out in the wind, with bent ribs. Aya’s face is frozen in shock, glasses slightly crooked. Speech bubble from Aya: “…You’re kidding.”
Panel 4 (bottom right, medium two-shot): Ren stands next to Aya, holding his big navy umbrella over both of them with a calm smile. Aya looks away, embarrassed, holding the broken umbrella. Speech bubble from Ren: “Want to share?” Smaller speech bubble from Aya: “…Just to the station.”
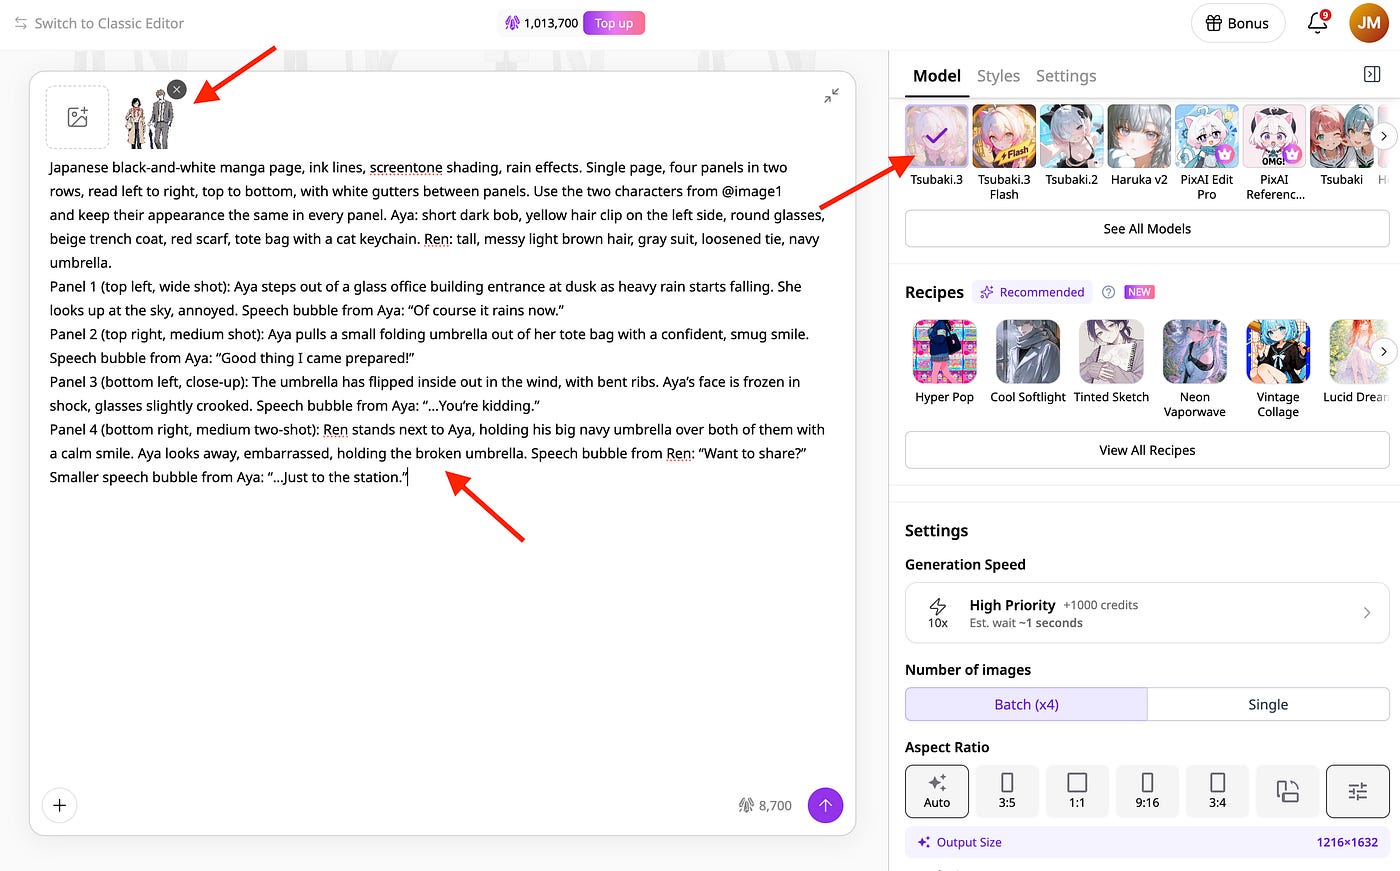
For the settings, I uploaded the reference sheet as @image1, picked Tsubaki.3 as the model, set the aspect ratio to 3:4, chose high quality, and generated one image at a time. I like using a tall aspect ratio for manga pages because it gives the four panels enough room so they don’t feel squished.
If you want more tips on writing prompts for this model, check out PixAI’s Tsubaki.3 prompt guide.
Generate the First Manga Page and Check the Storytelling
I hit generate, and here’s what I got on the very first try:
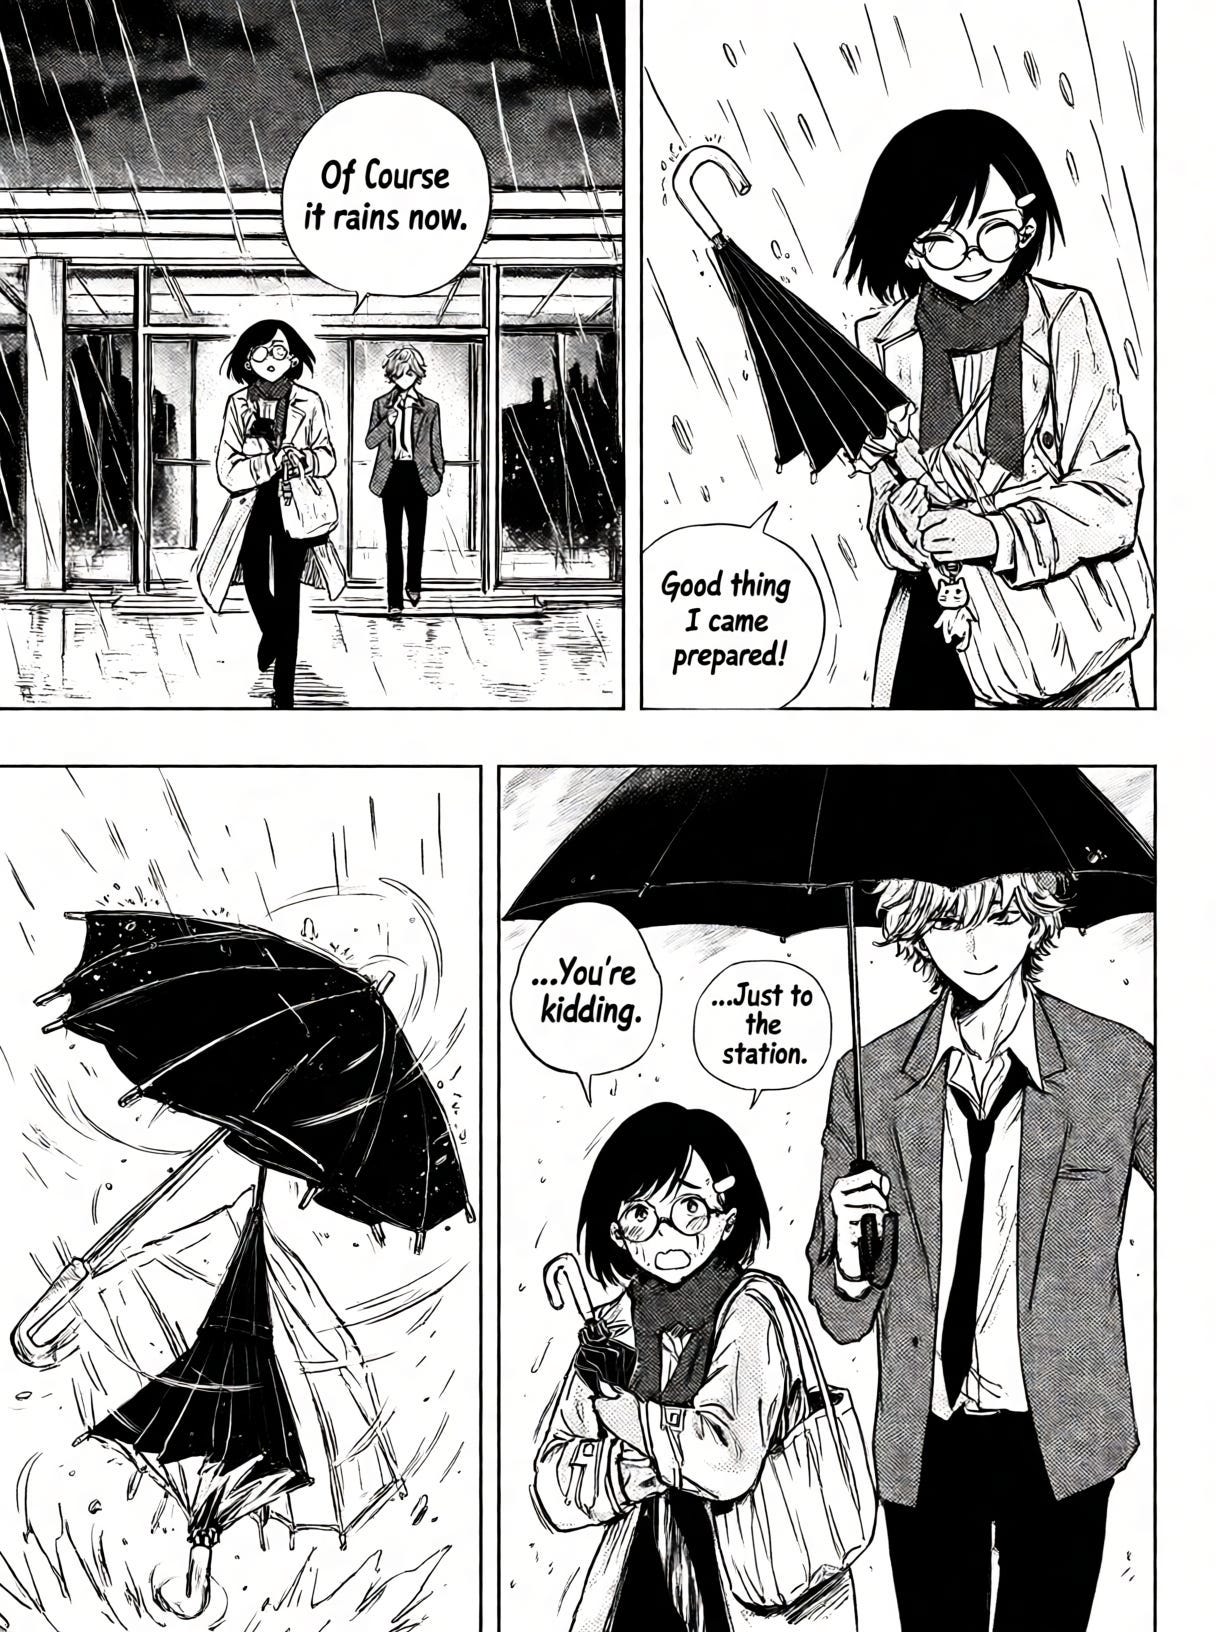
At first glance, I was really impressed. The hand-drawn style looks so cool, and it actually feels like a page from a real manga. Aya and Ren look exactly like the characters in my reference sheet. And every line of dialogue is spelled correctly, which is something I can’t say about most AI tools I’ve used.
But when I looked closer, I found a couple of problems.
In panel 2, the umbrella is upside down. The handle is sticking out from the tip instead of being in Aya’s hand. And in panel 3, there are two umbrellas when there should only be one.
Now, I could have regenerated the whole page or tweaked the prompt and tried again. But that’s the exact problem I talked about at the start. Every time you regenerate, you’re gambling with the parts that already look good. So instead, I decided to edit just the panels that needed fixing.
Editing Manga Pages with Tsubaki.3
To fix both umbrella problems, I used Tsubaki.3’s image editing and typed this instruction:
Prompt: In panel 2, fix the umbrella handle by moving it from the tip of the umbrella to Aya’s hand. In panel 3, remove the other umbrella because there should only be one.
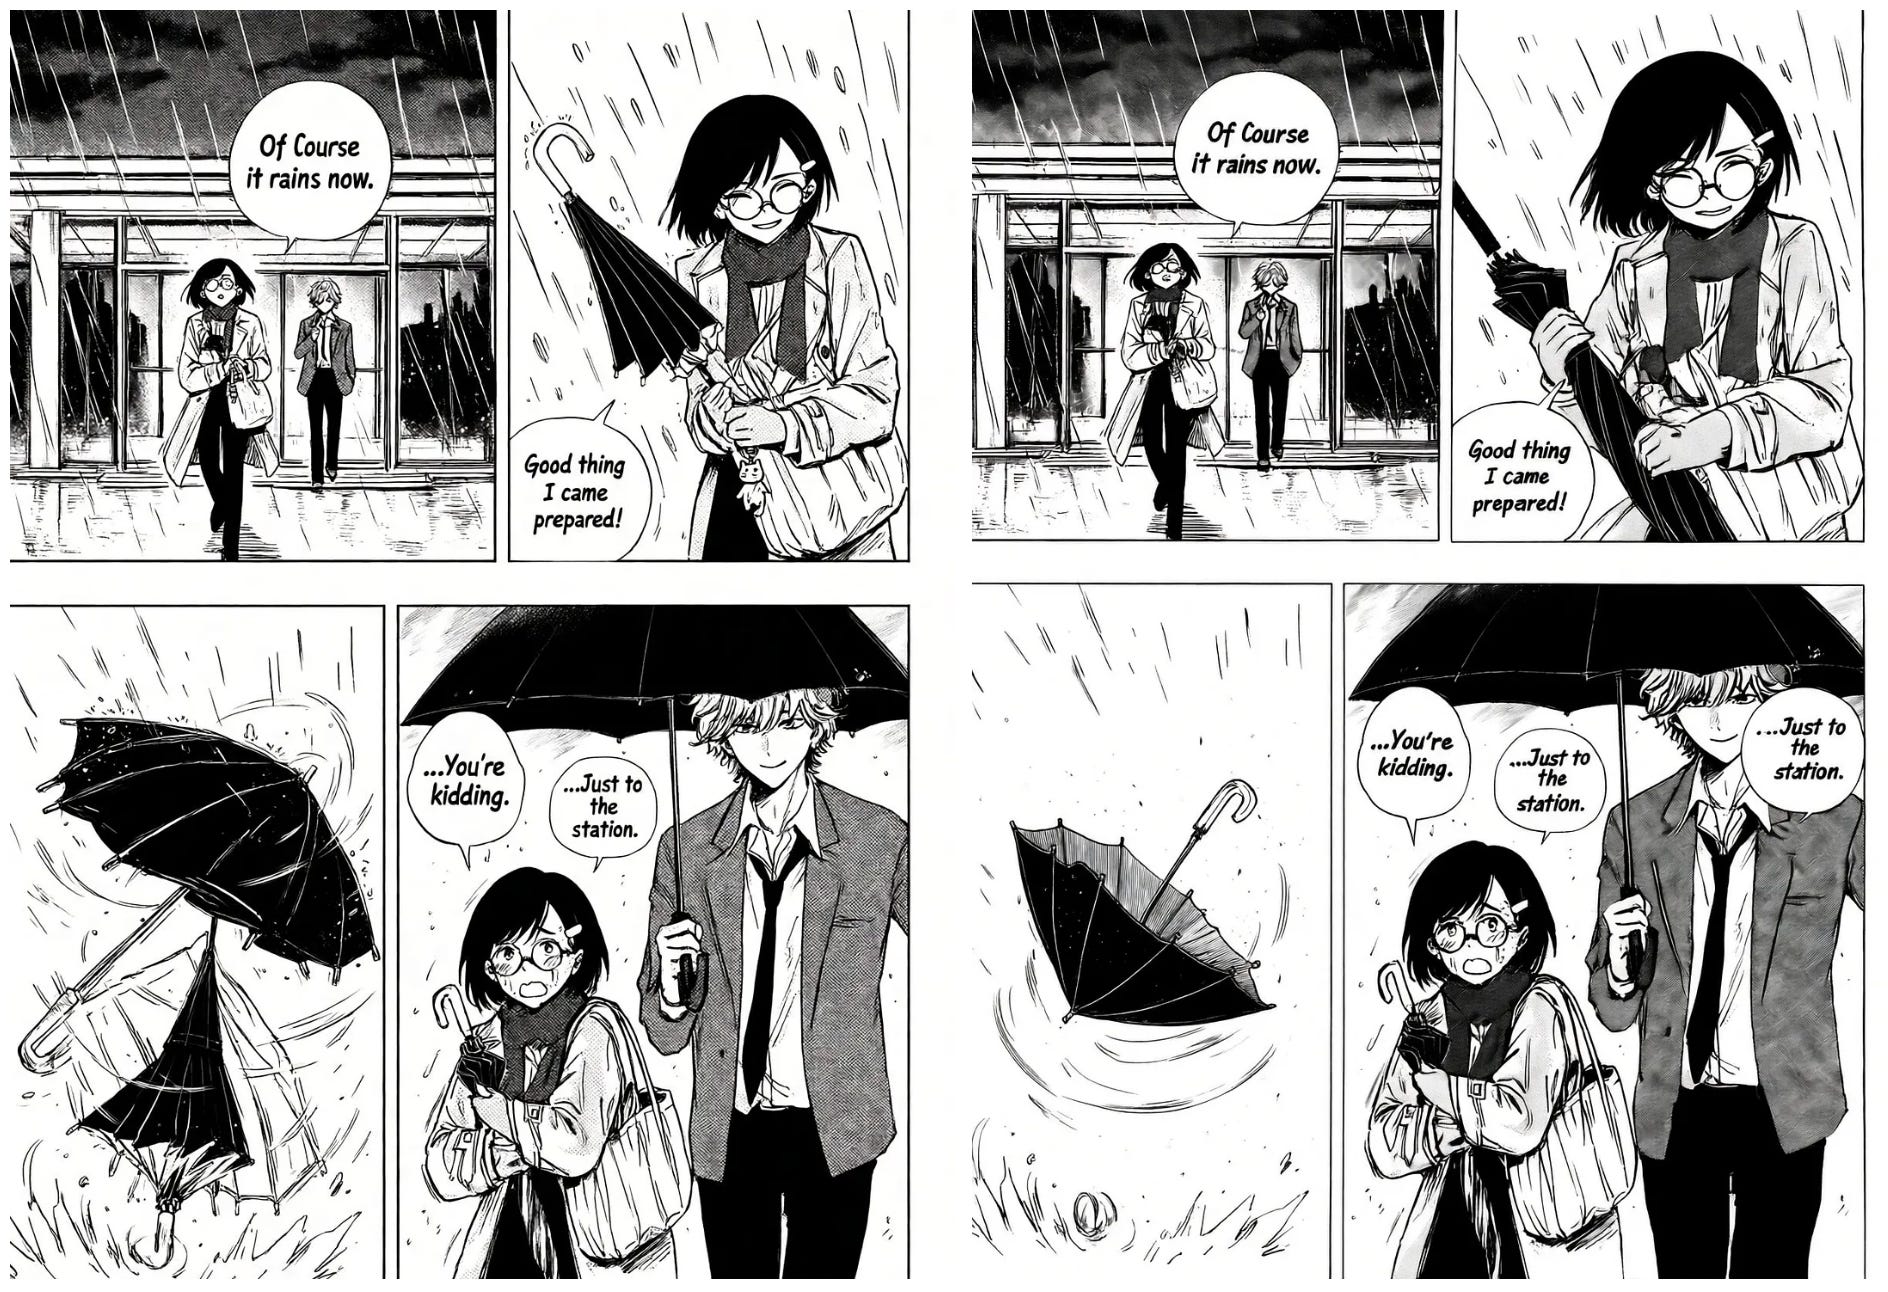
And just like that, both problems were gone. Aya is now holding her umbrella the right way in panel 2, and there’s only one umbrella in panel 3.
What I liked most is that the rest of the page didn’t change at all. Panels 1 and 4 look exactly the same as before. Now the whole page really looks like something hand-drawn from a manga book, and I think it would look even better in print.
Editing the Check Speech Bubbles
Next, I zoomed in on every speech bubble to make sure the text was right.
All the text is spelled correctly. The bubbles also don’t cover anyone’s face, which happens a lot with other AI tools.
But what if you want to change what a character says? Maybe you came up with a funnier line, or you want to add another speech bubble. You can do that with a simple edit too.
Prompt: In panel 4, change the speech bubble from “You’re kidding” to “Are you sure?”
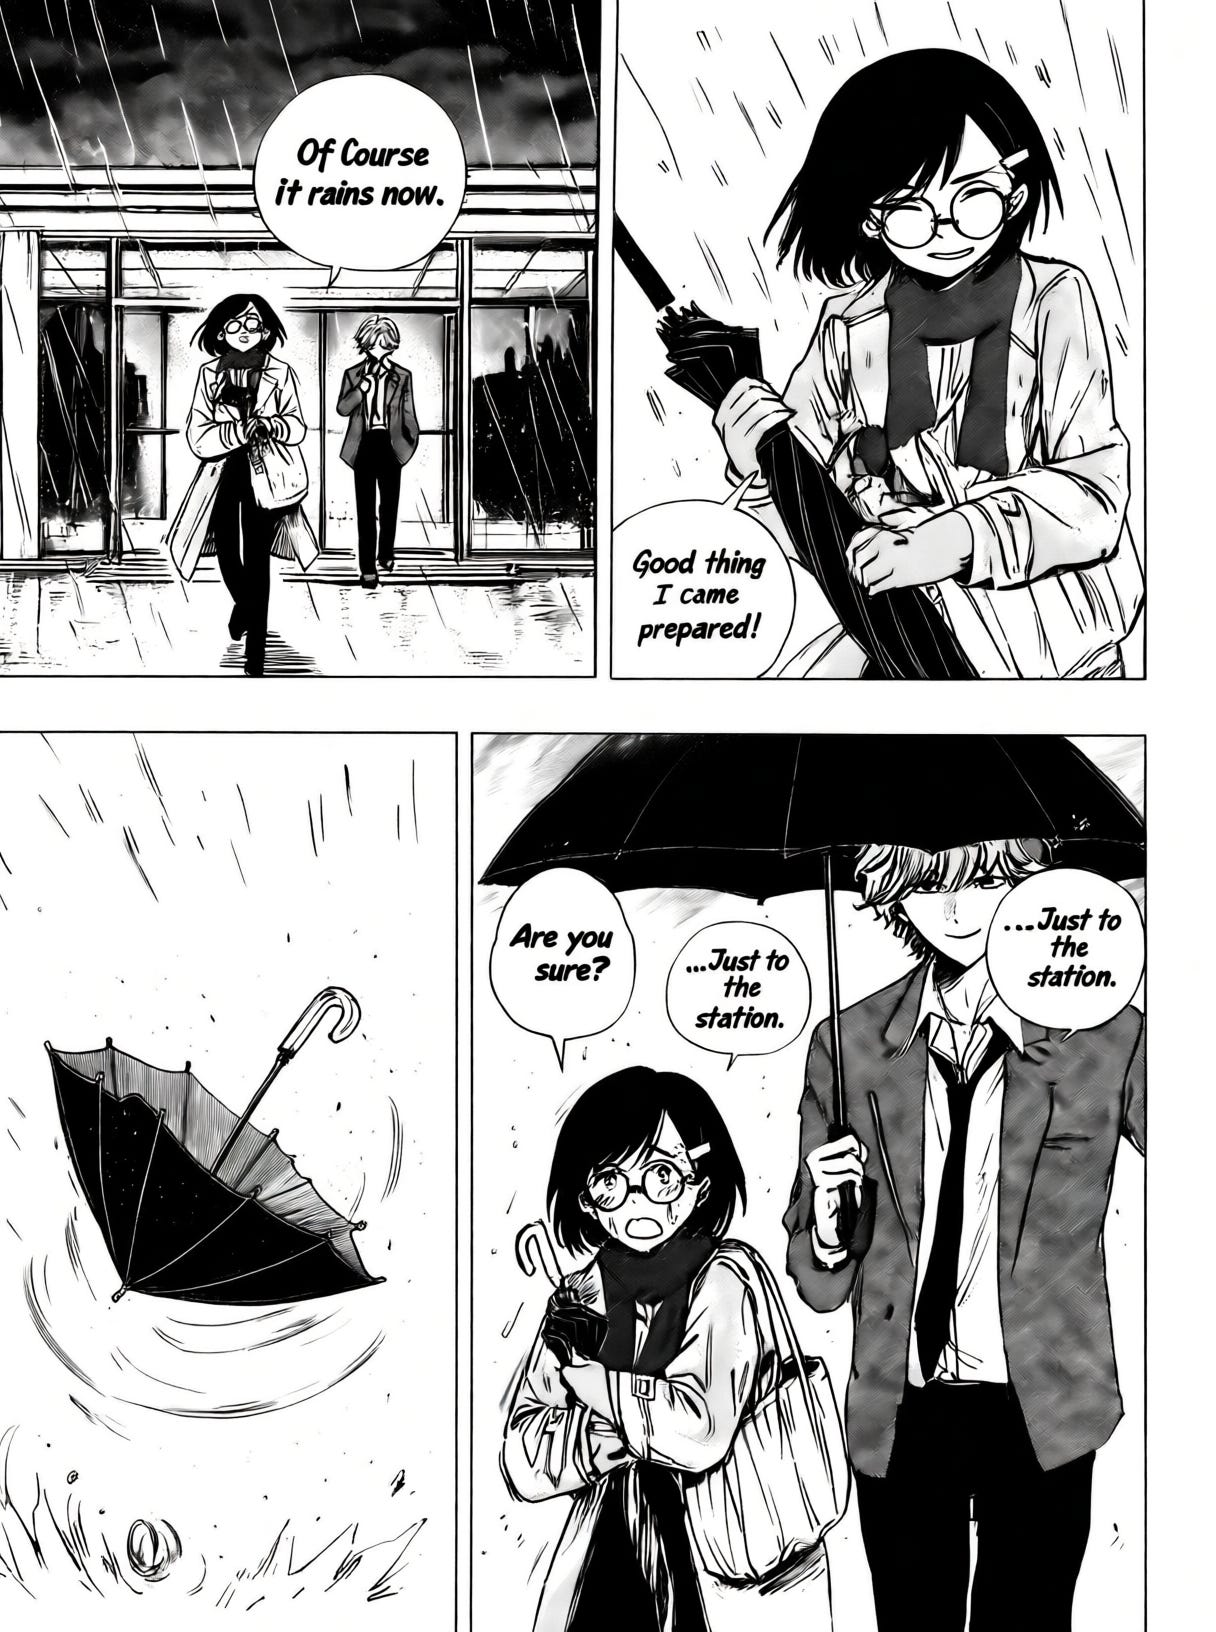
Pretty cool, right? I love how much control I have over the characters and what they say.
Editing a page in PixAI is just as easy as making one. You don’t need any drawing or lettering skills to fix a panel. You just type what you want to change.
Common AI Manga Problems and What Helped in This Test
Here are the problems I actually ran into while making this page, and what I did to fix them.
Merged panels: The AI combined panels 3 and 4. Regenerating with the same prompt gave me four separate panels, so I can’t credit specific wording for the fix.
Small details changing: Aya’s yellow hair clip switched sides, but one edit fixed it. The bright color made the mistake easier to spot.
Speech bubble pointing at the wrong person: The text was correct, but the tail pointed at the wrong character. Asking it to “point the tail toward Ren” fixed it on the first try.
Is Tsubaki.3 Useful for Making Manga Pages?
Yes, especially for short projects like four-panel comics, web comics, and storyboards. On the very first try, Tsubaki.3 got the layout, the camera angles, the characters, and every line of dialogue right. The story was easy to follow even before I made any changes.
The editing is where it really saved me time. I fixed two umbrella mistakes with one instruction and changed a line of dialogue with another. I never had to regenerate the page.
If you’re making a longer manga or something for print, I’d still check every page carefully. AI can still make small mistakes, like the umbrella, that are easy to miss.
Final Thoughts
I just walked you through how I made a manga page with Tsubaki.3, from planning the story to fixing the mistakes.
If you want to try this yourself, here are a few things I’d keep in mind. Plan out your panels before you write the prompt, because the AI can’t follow a story you haven’t figured out yet.
Zoom in and read every speech bubble. Look closely at how your characters are holding things. And when you find a mistake, try editing first before you regenerate the whole page.
I also want to thank the PixAI team for putting so much work into the manga features in Tsubaki.3. Getting the panels, the characters, the text, and the editing all in one place makes the whole process a lot more fun.
If you’ve ever wanted to make your own manga, now’s a good time to try. Pick a simple scene with one funny or emotional moment, plan out four panels, and give it a go on PixAI.
Let me know what you think in the comments.
Hi there! Thanks for making it to the end of this post! If you enjoyed this content and would like to support my work, consider becoming a paid subscriber. Your support means a lot!