I Found an AI Tool That Creates 3D Assets You Can Actually Use
I tested Meshy's text-to-3D and image-to-3D tools to see if the results are clean enough for games, animation, and real creative work.
AI image and video generators are everywhere now. Give one of them a decent prompt, and it can produce something impressive in seconds. But 3D is a much harder problem. A complete 3D model has to work from every angle. The geometry needs to hold together, and the textures must wrap around the object correctly.
This may explain why many 3D artists are still cautious about using AI. Poliigon’s State of 3D 2025 survey collected responses from 3,779 artists around the world. Only 22% said they used AI in their work daily or a few times a week. For dedicated AI 3D model generators, regular usage was below 5%, while 68% said they had never used one.
Most artists still use generative AI for concept art and look development. Only 18% had used it for final assets. People are curious, but placing an AI-generated model directly into a project is another story.
The investment is coming anyway. Autodesk’s 2025 State of Design & Make report covered 5,594 professionals across several industries. More than two-thirds of business leaders planned to increase AI spending, even though only 40% said their companies were close to achieving their AI goals.
The wider 3D mapping and modeling market is also projected to grow from $7.12 billion in 2024 to $16.78 billion by 2030. That forecast covers the overall 3D industry, not just AI-generated models, but it shows how much demand there is for faster ways to create 3D content.
Generating a model is only the first step, though.
I wanted to know if an AI tool could produce something with decent geometry, detailed textures, and enough export options to be useful outside its own preview window. That brought me to Meshy AI.
What is Meshy AI?
Meshy AI is a browser-based platform for generating and editing 3D models with AI. I can start with a written prompt, upload reference images, or import an existing model that needs new textures or cleaner geometry.

Text to 3D and Image to 3D are the obvious starting points, but Meshy covers more of the workflow than I expected. Multi-image to 3D accepts up to four views of the same object, which gives the model more information about its proportions. AI texturing can generate PBR materials, while remeshing lets me adjust the topology and polygon count.
Character assets can also be auto-rigged and paired with animation presets. For users who prefer a more guided process, 3D Agent provides a chat-like workflow that can begin with an idea, photograph, or sketch.
Finished models can be exported as FBX, OBJ, GLB, or STL. Meshy also connects with Blender, Unity, Roblox Studio, and several 3D printing tools. There is an API for teams that want to add generation, texturing, remeshing, rigging, or animation to another product.
It is a broad set of features. Still, none of that tells me whether the models look good once they start rotating. So I began with the simplest option.
Creating my first 3D game character from text
Text to 3D works much like an AI image generator. I describe the asset, and Meshy builds the initial geometry. Once the shape is ready, I inspect it from every angle before generating textures.
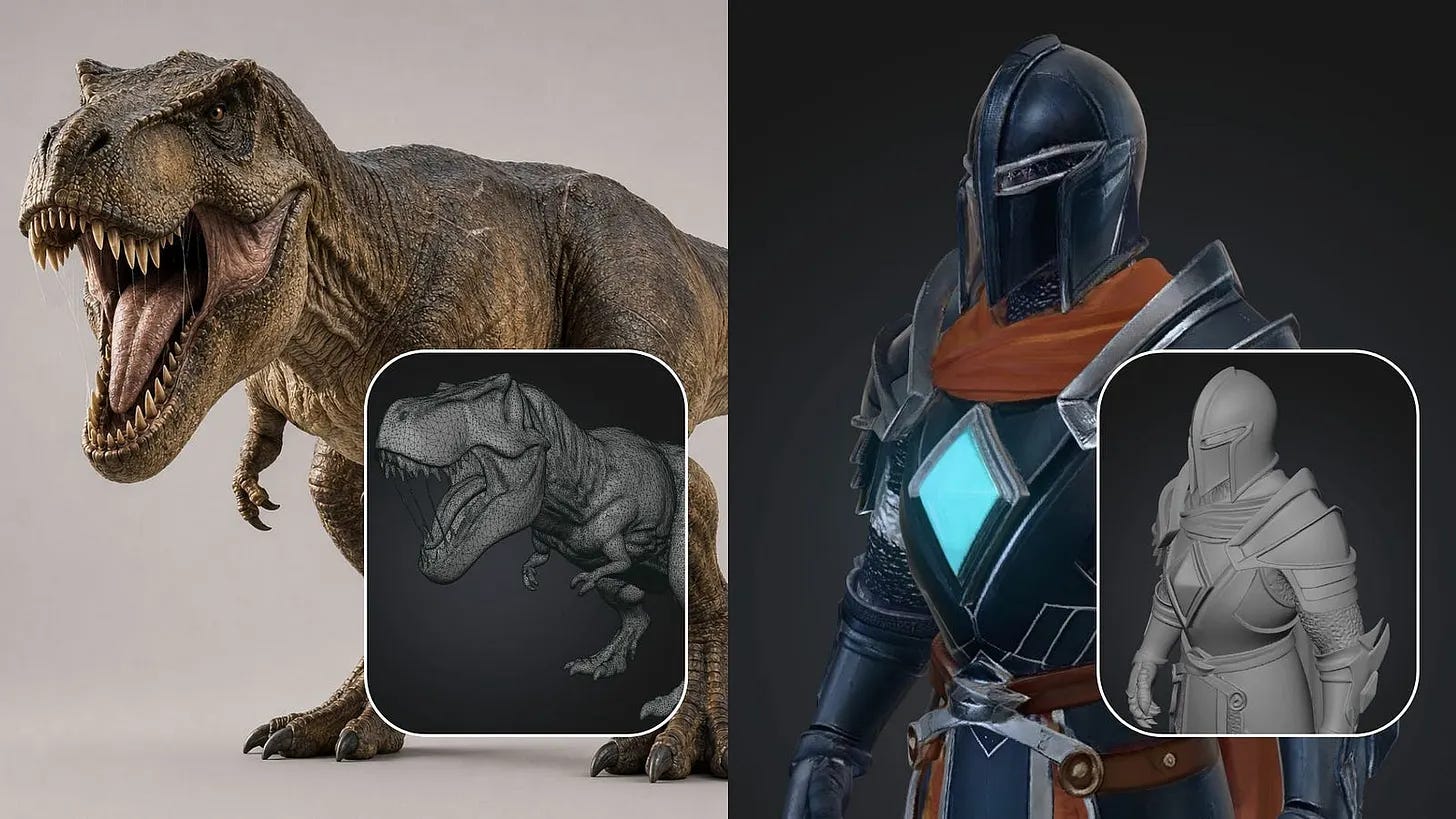
For my first test, I asked for a stylized fantasy knight. Characters give the model several chances to mess up. The armor must remain separate, the proportions need to make sense, and the cape cannot melt into the back.
Here is the prompt I used:
Create a full-body stylized fantasy knight for a third-person adventure game. The character wears dark blue and silver plate armor with a short brown leather cape, heavy boots, metal gloves, and a small glowing blue crystal on the chest. Give the knight broad heroic proportions and a simple helmet with a narrow visor. Keep the character symmetrical, centered, isolated, and standing in a neutral A-pose with no weapon, platform, background, or additional objects. Use clean game-ready geometry, clearly separated armor pieces, and detailed PBR materials for metal, leather, and fabric.

I deliberately kept the knight in a neutral A-pose because I wanted something that could be rigged later. I also removed the weapon. Swords and shields look good in a concept image, but they can hide the body, fuse with the hands, or make automatic rigging harder.
The first mesh was cleaner than I expected. The silhouette worked from the front and side, and the major armor pieces did not collapse into one shape. Meshy also carried the design around the back.
The texture stage made a much bigger difference.

The metal, leather, and fabric had noticeably different surfaces. The blue crystal gave the chest a clear focal point, and the armor no longer looked like several flat colors painted over the same material.
I would not call it production-ready without checking the topology. The armor gaps, joints, hands, and cape deformation all need closer inspection before rigging.
For a prototype, background character, or starting mesh, this was already useful. Building the knight manually would involve modeling each part, cleaning the topology, unwrapping the mesh, and painting several materials.
That was a good first result, but characters have lots of organic shapes where small errors can blend in. I wanted to try something less forgiving.
Animating the model
Once your character model is ready, click the Animate button to open Meshy AI’s animation workspace. From there, you can browse a library containing more than 600 motion presets. These include a wide range of movements suitable for games and other 3D projects, such as walk cycles, combat actions, and attack animations.
Before applying an animation, click the Rig button to automatically rig your character.
Follow the on-screen instructions and align each marker with the corresponding part of the model’s body. Correct marker placement helps the system build a cleaner and more accurate skeleton.
After confirming the marker positions, Meshy AI will process the model and generate a fully rigged character. You can then preview different animation presets and choose the motion that works best for your project.
For this example, a walk cycle or attack animation is a good way to demonstrate the quality and flexibility of the generated rig.
Here’s the sample output:
The rig came out clean, and the presets made it easy to test different movements. In just a few minutes, I turned a static model into an animated character, a process that would normally take much longer and require several tools. It’s a great example of how generative AI makes 3D character creation faster and more accessible.
Creating and animating this character cost me 35 credits, or about $1.12 based on the $8 price for 250 additional credits. In total, I spent 75 credits, or around $2.40, to generate all the assets featured in this article.
At that rate, the platform offers excellent value for rapid prototyping.
Testing Meshy with a hard-surface game prop
For the second test, I chose a medieval treasure chest. Hard-surface objects make mistakes easy to see. A chest has straight edges, repeated metal bands, a centered lock, and a symmetrical shape. Bent surfaces or drifting hardware become obvious once it rotates.
Here is the prompt:
Create a stylized medieval treasure chest for a fantasy role-playing game. Use thick dark oak planks, reinforced iron bands, a large brass lock, metal corner guards, and small scratches from years of use. The lid should be closed and the chest should have a slightly exaggerated shape suitable for a stylized game. Keep it centered and isolated with no floor, coins, background, text, or extra objects. Use clean low-poly geometry and detailed PBR textures for wood, iron, and brass.

The chest held its shape surprisingly well. The wood, iron, and brass were easy to distinguish, while the scratches added age without covering it in random damage. The lock stayed centered, and the metal bands continued over the lid.
I especially liked that the larger metal parts had actual depth. The detail did not exist only in the texture, so the chest reacted better when I moved the light around it.
I would still clean some edges and inspect the underside before using it as a hero asset. But as a prop inside a level, it was convincing.
This is where Meshy started to make practical sense to me. A game environment may need dozens or hundreds of secondary objects. Generating a first version, lowering the polygon count, and cleaning only the visible problems could save a lot of repetitive modeling time.
Turning a high-quality image into a 3D model
Text prompts leave plenty of room for interpretation. Image to 3D gives Meshy a much clearer target because the reference already defines the subject, proportions, colors, and surface details.
I made this test harder by uploading a detailed image of a roaring dinosaur. It had textured skin, visible teeth, an open mouth, and an aggressive pose. This was not an easy product photo.

I initially had doubts. Meshy still had to invent the back, opposite side, and parts hidden by the camera angle. A single image cannot provide an exact reconstruction.
I switched to the Image-to-3D mode and uploaded the reference photo. I set the model to Meshy 6 and hit the Generate button.

Here’s the final textured output:

Meshy preserved the large head, open jaw, muscular legs, and forward-leaning pose well enough to make the model immediately recognizable. The texture followed the original colors and carried much of the skin detail across the visible areas.
The unseen side impressed me more. Meshy generated a complete back and opposite profile instead of a hollow cutout. Those areas were more generic because the system had to guess, but they remained consistent with the reference.
To talk about the limitations. The mouth, teeth, claws, and other thin parts would need careful inspection. These details can look fine in a rendered preview while containing geometry that is difficult to animate or print. The pose also limits how easily the dinosaur could be rigged compared with a neutral stance.
Even with those issues, the result was a strong starting point. I could take it into Blender for cleanup, export it as a GLB for an interactive web scene, or use it as a visual prototype before building a production version.
For objects where accuracy is more important, I would use Multi-image to 3D and provide front, side, rear, and three-quarter views. Giving the model more visual information should reduce how much it needs to invent.
The best ways to use Meshy AI
After these tests, I do not see Meshy as a replacement for a complete 3D workflow. I see it as a way to get past the empty scene and reach the first usable version much faster.
Game prototyping is the clearest use case. A small team could generate temporary characters, props, and buildings while testing an idea. Those assets can establish scale and atmosphere before the final art is ready.
Retexturing may be just as useful for experienced artists. If the geometry already works, there is no reason to generate a new mesh. Meshy can apply a different PBR material or visual direction to an uploaded model, which is useful when testing several art styles.
Auto-rigging and animation can help with previs, prototypes, and short scenes. I would still test deformations carefully, especially around shoulders, hands, clothing, and tails. Automatic rigging saves time, but it cannot know every way a custom character is supposed to move.
Image to 3D also fits product previews and AR. A store could turn photos into interactive web assets, while a designer could place an early concept inside a virtual scene. I would use multiple references because dimensions and small details need more accuracy than a fictional prop.
Meshy supports STL export and provides remeshing and repair tools for 3D printing. I would not send an AI-generated object straight to a printer without checking wall thickness, intersecting geometry, and watertightness, but it can provide a useful base for a physical prototype.
How much does Meshy AI cost?
Meshy has a free plan with 100 credits per month. A complete Meshy 6 Text to 3D or Image to 3D generation currently costs 20 credits, including the mesh and texture stages. That gives free users enough credits to run several tests before paying.
The Pro plan costs $20 per month and includes 1,000 credits. Premium costs $40 per month with 3,000 credits, while Ultra costs $100 per month with 10,000 credits. The Studio plan starts at $60 per seat each month and requires at least two seats. Enterprise pricing is customized.
Paid plans add private assets, unlimited downloads, API access, Multi-image to 3D, faster queues, and more than 600 animation presets. Free-plan outputs use a CC BY 4.0 license, so anyone planning commercial work should review the current licensing terms before publishing or selling an asset.
The free plan is enough to see whether the workflow fits. Serious iteration will consume credits quickly, especially when I generate several versions, test textures, remesh the result, and try different references.
Final thoughts
Alright, I started this test with one question: can Meshy create 3D assets that are useful beyond a good-looking preview?
For the knight, treasure chest, and dinosaur, I think the answer is yes, with some reasonable limits. The outputs were clean enough for prototypes, background assets, visual development, and starting meshes. I would still inspect topology, joints, thin parts, and hidden surfaces before using them in production.
I have always enjoyed playing with 3D modeling, but creating every object from scratch takes a lot of time. Meshy gives me a faster place to begin. It does not remove the need for experienced 3D artists, and I do not think that should be the goal. Someone still needs to judge the result, fix the geometry, and decide whether it fits the project.
What do you think about the models Meshy generated here? If you have tried another AI 3D tool that produced better results, let me know in the comments.
Hi there! Thanks for making it to the end of this post! If you enjoyed this content and would like to support my work, consider becoming a paid subscriber. Your support means a lot!


