Try Any Outfit on Anyone With This AI Tool
Flux Labs AI just released an improved version of its virtual try-on feature. Here's a step-by-step guide on how to overlay clothes onto a photo, creating a virtual “try-on” experience.
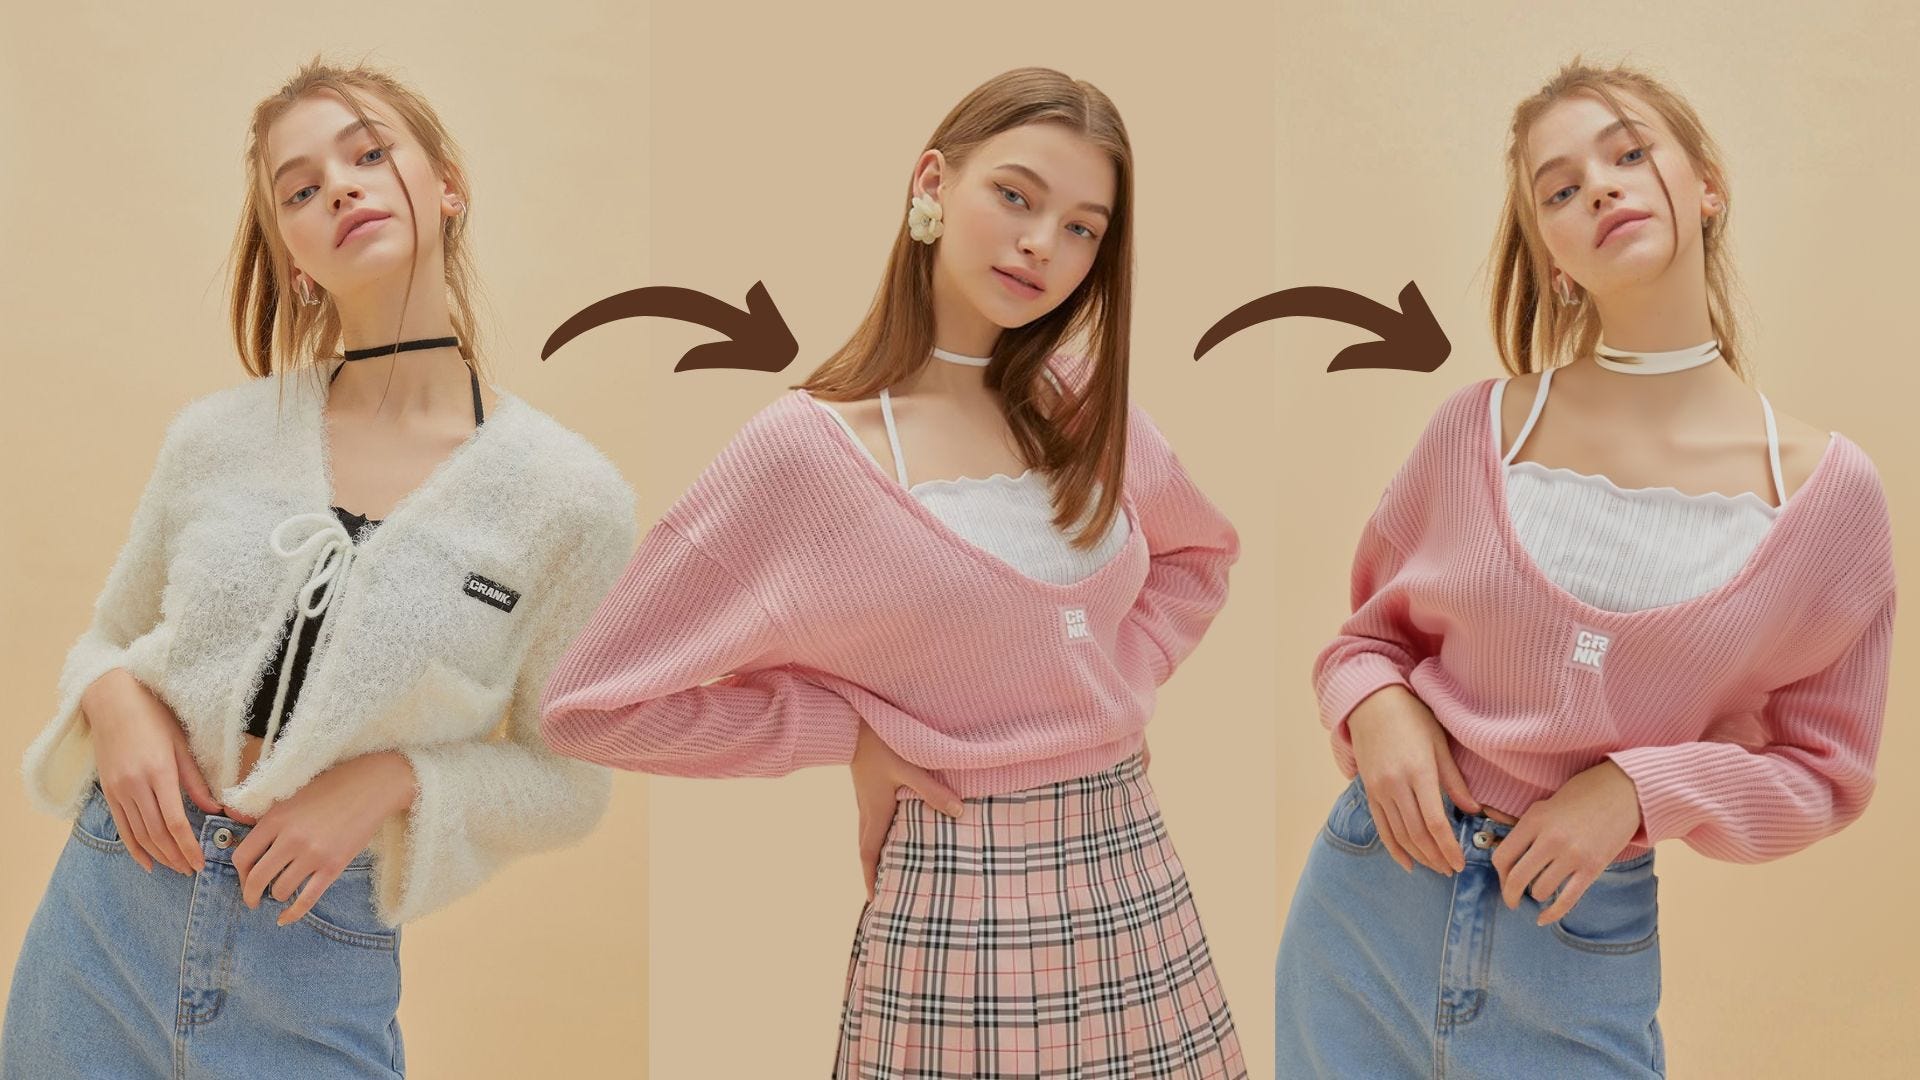
In the past couple of days, I’ve been working hard upgrading the virtual try-on feature of Flux Labs AI.
If you’re not familiar with it, virtual try-on is a tool that lets you see how a piece of clothing would look on someone without needing to actually wear it. It uses AI to overlay clothes onto a photo, creating a virtual “try-on” experience. You just upload a model image and a garment image, and the tool handles the rest.
The first version of this tool was released back in February 2025. It worked well for the most part, but it had a few limitations that some users pointed out. Things like needing a strict 2:3 aspect ratio, low resolution outputs, and not much flexibility with input images.
I took note of all those.
So today, I’m happy to share that the virtual try-on feature just got a big upgrade. It now runs on a newer AI model that supports higher resolution outputs and works with more flexible aspect ratios. I also gave the user interface a refresh to make it easier to use.
In this article, I’ll walk you through what’s new, how it works, and show you some actual examples. I’ll also show you how you can take your try-on results and turn them into a full video using another tool inside Flux Labs AI.
Let’s get started.
What’s New In Virtual Try-on?
One of the biggest improvements in Flux Labs AI this month is the virtual try-on upgrade. This update focuses heavily on what users have been asking for, and I’m happy to say that the changes are more than just visual upgrades.
The most notable update to the virtual try-on feature of Flux Labs AI is the upgraded AI model. The new model now supports 1MP outputs and works with flexible input aspect ratios. This means higher-quality results without sacrificing generation speed.
Here’s a sample side-by-side comparison between the old and new models.

You can now confidently submit images of various sizes and aspect ratios, knowing that Flux Labs will automatically adapt to deliver larger, high-resolution outputs without compromising the exceptional realism and quality you’ve come to expect.
The upgrade now smartly concentrates its effort on precisely the area that matters most. This ensures you get larger outputs and more flexible aspect ratios effortlessly.
The key advantages include:
Larger output resolutions without performance trade-offs
Freedom from strict 2:3 aspect ratio constraints
No impact on processing speed or runtime
New User Interface
Before I show you the examples, I want to highlight some changes in the UI. Here’s a quick side-by-side comparison of the old and new layout.
The new interface now supports the following:
You can now drag and drop your input images for both the subject and the garment.
I added a swap button to quickly switch between the model and garment images without re-uploading.
The new try-on model supports “Auto Mode” for garment category detection. This means you no longer have to manually label your image as a top, bottom, or full-body item.
You also get new quality modes to choose from: Performance, Balanced, and Quality, depending on how much detail you want in your output.
That said, not all of these options are available when using the older v1.0 model. If you select that one, the Quality Mode options disappear, and Auto Mode for the garment category is disabled. This keeps everything compatible but still allows power users to explore the newer model’s capabilities.

You can switch between the models easily from the Advanced Settings menu. There’s also a handful of other options under the hood for those who want finer control over how the output looks. Personally, I think the default settings work well enough in most cases, but I know some users enjoy tinkering.

Okay, that’s about it for the UI upgrades. Now let me show you some examples.
Virtual Try-on Examples
Now that we’ve covered what’s new, let’s get into some real-world examples to show you how the upgraded system performs. The virtual try-on tool requires two images to work: a subject image and a garment image.
Subject: This is the image of the person (or model) where the clothing will be applied.
Garment: This is the image of the clothing item, either worn by someone else or displayed on its own.

When uploading your subject image, take note of the following:
It is recommended to use a 2:3 aspect ratio image.
Make sure the outfit is fully visible.
It is better if the subject is wearing tight clothes.
Make sure the subject is not cropped or small.
Upload only high-quality images for better results.
For the garment image, take note of the following:
It is okay if you upload either the garment only or one worn by a subject.
Make sure the garment is fully visible and not folded.
Upload only high-quality images for better results.
Once you have your subject and garment ready, head to fluxlabs.ai and open the Virtual Try-On tool under AI Tools. You will be redirected to the screen below.

Upload both images on the left side. If you want to quickly switch them, use the swap button. Then, under Garment Category, select either Top, Bottom, or Full-body depending on the clothing type. Or just leave it on Auto and let the model decide.
For Quality Mode, you can choose between Performance, Balanced, and Quality. Higher quality takes a bit more time, but the difference in detail is usually worth it.
You can still play around with more configuration options by expanding the Advanced Settings menu. I recommend leaving them at the default for more optimal results.
Once everything’s set, hit the Try On button and give it a few seconds to process. Here’s an example result I tried:

Awesome. The AI managed to transfer the clothing naturally, with minimal artifacts. There’s a small glitch around the neck, but it’s barely noticeable. The overall output looked great and realistic.
Here’s another example using male models.

This is perfect if you already have an image of a model and you just want them to wear something else from your clothing store. No need for an expensive and time-consuming photo reshoot.
Using a male subject and a female reference photo is completely fine, too. As long as the garments are clearly visible in the image, there is no restriction. Check out the example below:

The model doesn’t care about gender — it just analyzes structure and makes the garment fit. That’s a huge plus if you’re experimenting with different outfit combinations or targeting unisex fashion.
I had a lot of fun using the upgraded virtual try-on feature on Flux Labs AI. In the example below, the image on the left side is AI-generated using the Flux image model. It still works perfectly when combined with a photo of the real model.

In the example below, I tried to upload a full-body shot of a model as the subject. The result is still seamless and good.

Turn Images Into Videos
Here’s what makes things really interesting.
Flux Labs AI has a feature called UGC video generator, where you can upload your image, and the AI will turn it into a realistic video. You can even add a custom script and a matching voice to make the subject talk like a real person.
Here’s how it works:
First, download the try-on image you just generated. Then head over to the UGC Video Generator. Select the “No need for product photo” and upload the image to the AI influencer field.
For the video description, make sure to describe how you want the subject to move or behave. For this example, I used the description below:
Video description: A girl posing for a fashion photoshoot. She’s making various poses
This is what your dashboard should look like:

Set the video duration and pick the quality level. The better the quality, the longer the generation time — but again, it’s worth it.
Click Generate and wait for the video to appear in the output section. Once it’s done, you’ll see the same subject from your try-on image, now moving naturally like a real person.

You can even add a script and a voice to make the subject talk, which adds another layer of realism to the experience.
Here’s a preview of what the video looks like:
Pretty cool, right? I love how smooth the movements look and how the clothing behaves when the model moves. You can see the fabric crumple and shift just like it would in real life.
Why Should You Care?
Sure, AI fashion tools like this come with their fair share of ethical concerns, especially around realism, consent, and authenticity. But putting that aside for a moment, the benefits are hard to ignore.
If you’re shopping online, you can now preview how clothes might look on a body that closely resembles yours. No more guessing from flat product shots or hoping the model has the same body type as you.
If you’re running a clothing store, this is a really useful tool. You don’t need to book models or photographers anymore. Just upload your product images and see them come to life on virtual models. Want to take it up a notch? Turn those AI try-on photos into actual videos using the UGC tool and post them on your website or social media.
Even influencers or creators who just want to refresh their feed can use this. You don’t need to buy new clothes for every post. Just swap your outfit digitally, and you’re good to go. The final image looks real enough that nobody would even guess it’s AI.
This tool helps you save time, avoid unnecessary expenses, and still get awesome-looking outputs.
Final Thoughts
I’m really proud of this upgrade. Virtual try-on has always been one of the most fun and useful features inside Flux Labs AI, and with this new version, it finally feels like it’s getting closer to what I originally imagined.
For those of you who are curious about the backend, the updated try-on runs on the Fashn AI model v1.5. They haven’t shared much publicly about how their model works, but based on some of the logs I’ve seen, it looks like it might be using Google’s Gemini 2.0 under the hood. I can’t confirm it for sure, but I’ve seen enough hints to make an educated guess.
Regardless of what’s powering it, the quality speaks for itself. The output resolution is better, the overall composition looks more natural, and it works smoothly with more flexible inputs. I’m also happy with how well it integrates with the UGC video generator. You can generate a try-on image, turn it into a full video with voice and movement, and use that to promote your brand or product — all in one place.
I worked really hard to roll this out as fast as I could, and I’m excited to see how you use it.
If you run into any issues or have ideas for how it could be better, feel free to let me know in the comments. I’m always open to feedback.
Hope you enjoy it.
Hi there! Thanks for making it to the end of this post! My name is Jim, and I’m an AI enthusiast passionate about exploring the latest news, guides, and insights in the world of generative AI. If you’ve enjoyed this content and would like to support my work, consider becoming a paid subscriber. Your support means a lot!